🎣 Fishing Rod Epoxy Mix Ratio Calculator
Calculate exact resin & hardener amounts for rod building, guide wrapping & tip-top coating
| Epoxy Type | Mix Ratio | Pot Life | Cure Time | Best Use | Coverage (fl oz/in²) |
|---|---|---|---|---|---|
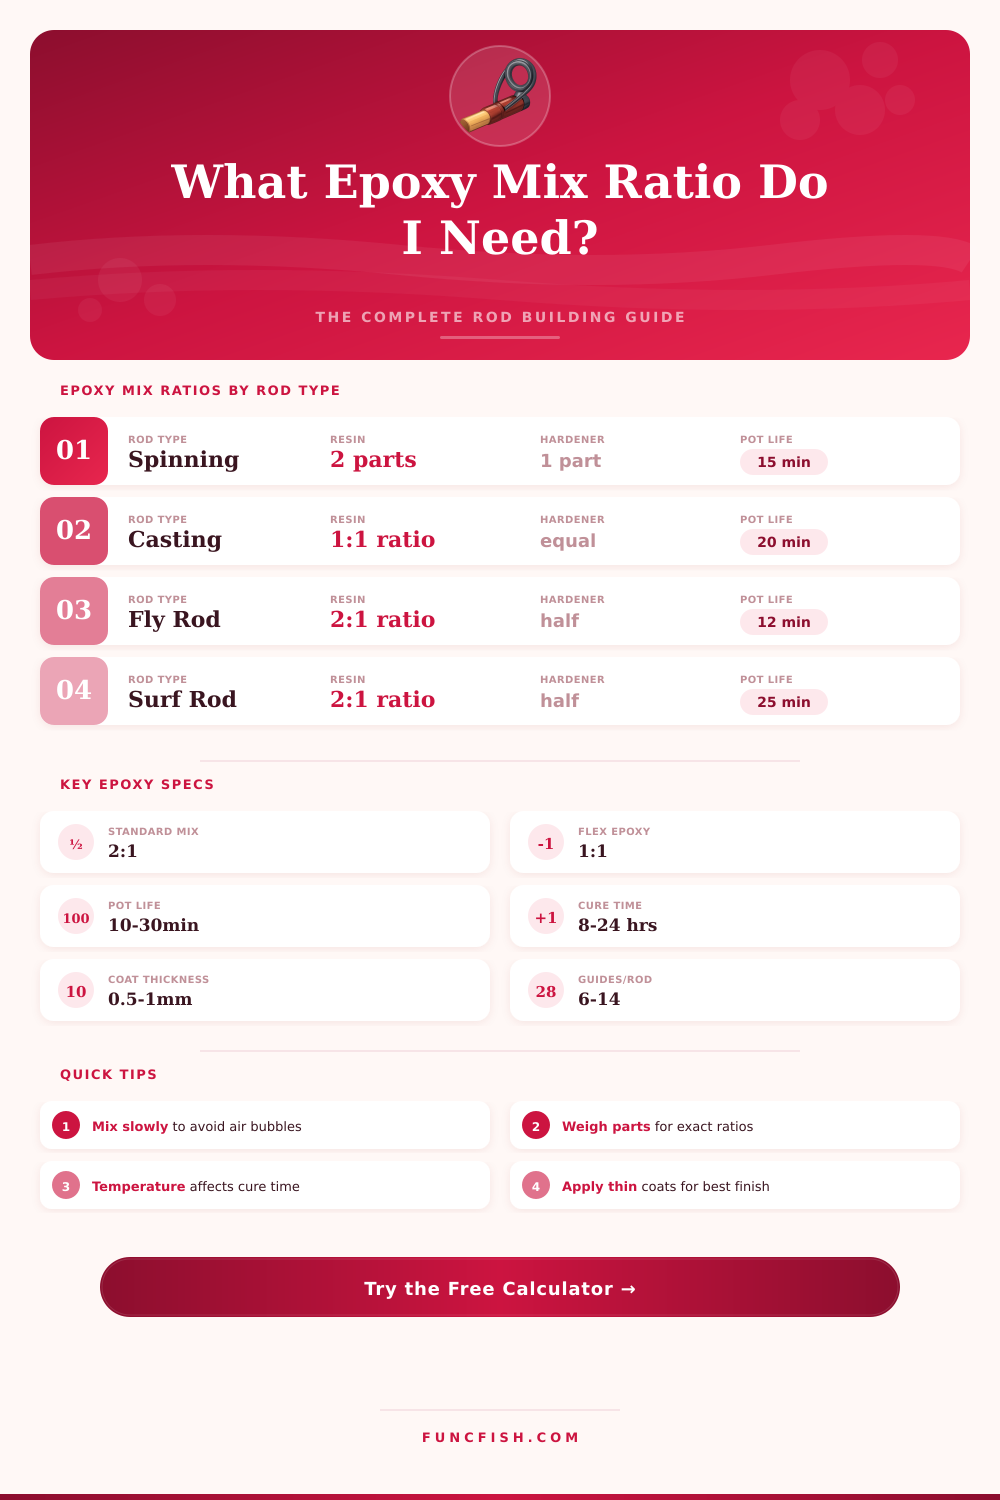
| Standard Rod Finish | 2:1 | 15 min | 12–24 hrs | Guide wraps, all rods | 0.020 |
| Flex Coat Epoxy | 1:1 | 20 min | 8–16 hrs | Flexible blanks, fly rods | 0.018 |
| High-Build Finish | 2:1 | 12 min | 16–24 hrs | Heavy surf/boat rods | 0.028 |
| Epoxy Gel | 1:1 | 10 min | 6–12 hrs | Tip-tops, spot repairs | 0.035 |
| UV-Cure Finish | N/A | Instant | 30–90 sec UV | Quick wraps, touch-ups | 0.015 |
| Thin Finish / Preserver | 2:1 | 18 min | 8–12 hrs | Color preserver, 1st coat | 0.012 |
| Rod Type | Typical Guides | Recommended Epoxy | Coats | Total Mix (fl oz) | Total Mix (ml) |
|---|---|---|---|---|---|
| Ultralight Spinning (5–6 ft) | 5–6 | Standard 2:1 | 2 | 0.20–0.30 | 6–9 |
| Light Spinning (6–7 ft) | 6–7 | Standard 2:1 | 2 | 0.28–0.40 | 8–12 |
| Med Spinning / Casting (7 ft) | 7–8 | Standard or Flex | 2 | 0.35–0.55 | 10–16 |
| Heavy Casting (7–8 ft) | 8–10 | High-Build 2:1 | 2–3 | 0.55–0.90 | 16–27 |
| Fly Rod (8–9 ft) | 8–10 | Flex Coat 1:1 | 2 | 0.35–0.55 | 10–16 |
| Surf Rod (10–13 ft) | 10–14 | High-Build or Gel | 3–4 | 0.90–1.60 | 27–47 |
| Boat / Offshore (6–7 ft) | 8–12 | High-Build or Gel | 3–4 | 0.80–1.40 | 24–41 |
| Jigging Rod (6–7 ft) | 7–9 | High-Build 2:1 | 2–3 | 0.45–0.80 | 13–24 |
| Temperature (°F) | Temperature (°C) | Pot Life Multiplier | Cure Time | Notes |
|---|---|---|---|---|
| <55°F | <13°C | 2.0x longer | 24–48 hrs | May not cure fully — avoid |
| 55–65°F | 13–18°C | 1.4x longer | 18–30 hrs | Suboptimal; heat lamp advised |
| 65–75°F | 18–24°C | 1.0x (baseline) | 12–24 hrs | Optimal range |
| 75–85°F | 24–29°C | 0.75x shorter | 8–16 hrs | Shorter pot life; work fast |
| >85°F | >29°C | 0.5x shorter | 4–8 hrs | Risk of bubbles; split into batches |
For best results, use a digital scale to measure resin and hardener by weight rather than volume. Volume measurements can introduce air and inaccuracies. A kitchen jewel scale accurate to 0.1g is ideal for small rod-building batches.
Rod epoxy has a limited pot life of 10–20 minutes at room temperature. Mix only as much as you can apply in 8 minutes to avoid partial curing. For rods with many guides, split into multiple small batches rather than one large mix.
| Guide Size | Wrap Width (in) | Wrap Width (mm) | Area per Guide (in²) | Area per Guide (cm²) | Epoxy per Guide (fl oz) |
|---|---|---|---|---|---|
| Micro (size 4–6) | 0.20–0.30 | 5–8 mm | 0.25–0.35 | 1.6–2.3 | 0.005–0.007 |
| Small (size 8–10) | 0.30–0.45 | 8–11 mm | 0.45–0.65 | 2.9–4.2 | 0.009–0.013 |
| Medium (size 12–16) | 0.45–0.65 | 11–17 mm | 0.65–1.00 | 4.2–6.5 | 0.013–0.020 |
| Large (size 20–25) | 0.65–0.90 | 17–23 mm | 1.00–1.40 | 6.5–9.0 | 0.020–0.028 |
| Stripper (size 30–50) | 0.90–1.30 | 23–33 mm | 1.40–2.00 | 9.0–13.0 | 0.028–0.040 |
Mixing epoxy are another necessary step after you have finished wrapping the threads on a bass rod. Using too little epoxy will result in the guide feet remaining hollow. Using too much epoxy will result in excess epoxy on your work surfaces.
You must calculate the correct amount of epoxy to apply to ensure that the guide wrap present a professional finish when complete. To accomplish this, you must understand the relationship between resin and hardener. The chemical reaction between resin and hardener will allow the epoxy to cures.
How Much Epoxy to Use on a Bass Rod
Depending on the type of epoxy application needed, the resin and hardener will have different ratio in the cured epoxy. For finish coats for guide wraps, thin layer are needed. For applications that involve bonding two component together, thicker applications is required to allow for proper contact between the two components.
Most guide wrap applications use a 1:1 ratio of resin to hardener. However, when filling gaps in oversized component, a 3:1 ratio is used. Additionally, volume measurements are not the same than weight measurements of the epoxy mixture.
The total amount of epoxy needed will depend on the surface area of the bass rod components. A single-foot spinning rod will require less epoxy than a double-foot casting rod because of the additional foot of the casting rod that increase the surface area of the rod. Calculating the average diameter of the bass rod is critical because the rod is thinner at the tip than the butt of the rod.
Additionally, any decorative trim band or hook keepers will increase the total amount of epoxy required for a rod build. Consider the number of coats of epoxy to apply. Two thin coats are better than one thick coat.
When bonding two component together, calculating the volume of the gap to be filled requires measurement from the inner bore of the component to be bonded to the rod. Additionally, if the component features textured grip or loose ferrules, it will absorb more epoxy than components without this feature. The bond length will dictate how much epoxy is used in the bonding process.
If you are to use arbor tape, extra epoxy must be allotted for this component because arbor tape pockets will hold extra epoxy. The temperature of your workspace will affect the curing rate of the epoxy. High temperatures will speed up the curing process.
This means you will have less time to work with the epoxy once mixed. If the temperature of your workspace is 75 degrees or higher, it is recommended to mix small batch of epoxy to combat the high temperature. Some epoxy waste will occur during the mixing of the resin and hardener.
Some epoxy will stick to the walls of the mixing cup, and some epoxy will stick to your application brushes. Therefore, accounting for this waste in your epoxy calculations is essential. Presets will allow you to calculate the amount of epoxy needed for specific builds.
Presets allow you to set the dimension of common rod builds, such as ultra-light spinning rods or musky rods. Then, you can adjust the presets for your specific application style. For instance, some application styles will require more epoxy for the thread tunnels on the rod than others.
Additionally, the presets will provide the shares of resin and hardener required to create the epoxy needed for your builds by both volume and weight. Many people will attempt to estimate the amount of epoxy needed for a bass rod by sight. However, this estimation will likely result in the loss of some epoxy or not having enough epoxy to completely wrap the rods thread.
Either outcome will result in weeping finish on the rod threads after the epoxy has cured. To avoid these issues, calculate the actual requirement for the rod build. Ensure you use up the epoxy in your mixing cup by scraping the walls of the mixing cup with your tool.
If the epoxy is too thick for the build, warm the bottles gently. However, you must never warm the epoxy with a microwave because the microwave will cook the hardener in the epoxy bottle unevenly. A few factor will change how the epoxy performs during the build process.
If the threads are too tight on the rod, the threads will not absorb as much epoxy as if the threads are loosely tensioned on the rod. Additionally, the humidity in the air will affect the work time of the epoxy because the humidity will slow the curing process of the epoxy. It is always a good idea to test the epoxy by making a test wrap of the specific epoxy you will use for your rods.
Your brush and the rate at which you rotate the rod will change the way the epoxy coats the rod. Finally, using weight ratio instead of volume ratios for the epoxy for structural bonds on ferrules allows for more precision in setting up the epoxy mixture for structural applications.