Blood Knot Wrap Count Calculator
Estimate separate wrap counts for each side of a blood knot using line diameter, material grip, line strength, tag length, finish quality, and diameter mismatch.
📌Blood knot presets
⚙Knot and line settings
Use package diameter when available; diameter matters more than printed line rating.
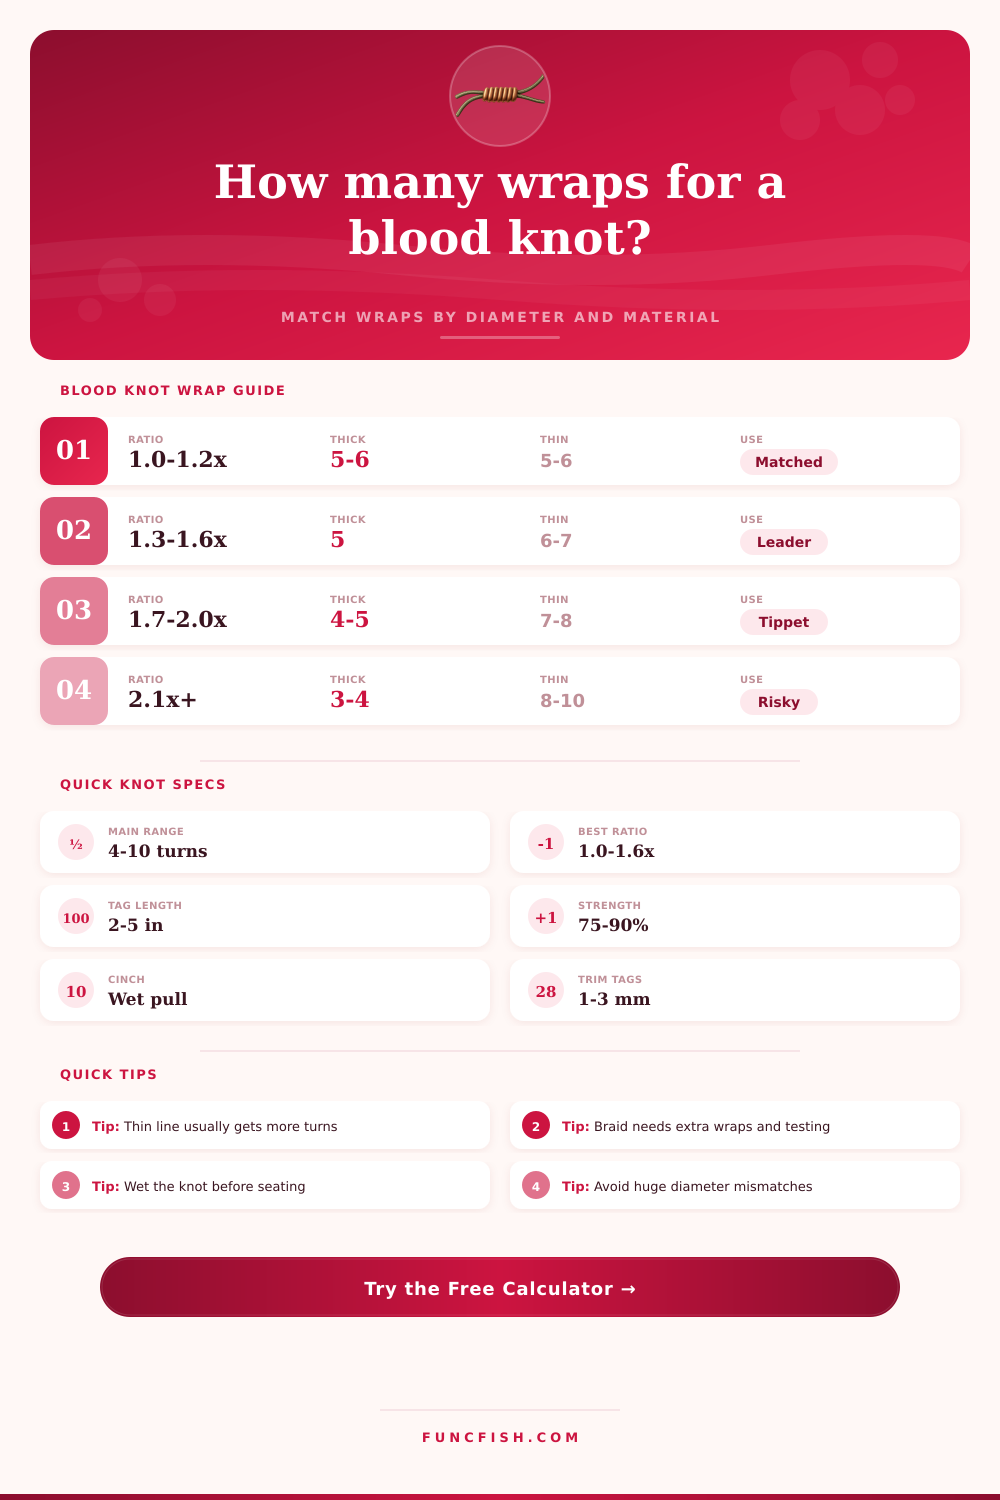
For different diameters, the thinner side normally receives more wraps.
Blood knots are easier with enough tag for wrapping, threading, and slow seating.
Blood knot wrap forecast
Calculation breakdown
🧵Line material data used by the calculator
Nylon Mono
Fluorocarbon
Copolymer
Hard Mono
Soft Tippet
Fluoro Tippet
Gel-Spun Braid
Coated Hybrid
📏Diameter and wrap reference tables
| Line diameter | Mono / copoly wraps | Fluoro wraps | Braid wraps | Starter tag length |
|---|---|---|---|---|
| 0.06-0.12 mm / .002-.005 in | 7-9 per side | 8-10 per side | 10-12 per side | 80-120 mm / 3.1-4.7 in |
| 0.13-0.22 mm / .005-.009 in | 6-8 per side | 7-9 per side | 9-11 per side | 65-100 mm / 2.6-3.9 in |
| 0.23-0.40 mm / .009-.016 in | 5-7 per side | 6-8 per side | 8-10 per side | 55-90 mm / 2.2-3.5 in |
| 0.41-0.65 mm / .016-.026 in | 4-6 per side | 5-7 per side | 7-9 per side | 65-110 mm / 2.6-4.3 in |
| 0.66-0.90 mm / .026-.035 in | 4-5 per side | 5-6 per side | not preferred | 90-150 mm / 3.5-5.9 in |
| Diameter ratio | Thicker side | Thinner side | Blood knot outlook | Field check |
|---|---|---|---|---|
| 1.0-1.2x | same wraps | same wraps | best range | seats evenly |
| 1.3-1.6x | minus 0-1 wrap | plus 1-2 wraps | good leader range | watch thinner tag |
| 1.7-2.0x | minus 1 wrap | plus 2-3 wraps | usable if dressed | pull-test hard |
| 2.1-2.5x | minus 1-2 wraps | plus 3-4 wraps | marginal | check for cutting |
| over 2.5x | short wraps | many wraps | not ideal | choose another knot |
🎣Gear and species comparison grid
Trout Tippet
Lines: 4-6 lb nylon or fluoro tippet
Wraps: 6-8 each, more on fluoro
Use: slim fly leader repairs
Bass Leader
Lines: 8-15 lb mono to fluoro
Wraps: 5-7 each
Use: clear-water casting leaders
Bonefish Leader
Lines: 8-16 lb tapered sections
Wraps: 5 thick, 7 thin
Use: smooth fly leader turnover
Walleye Rig
Lines: 6-10 lb mono to fluoro
Wraps: 6-7 each
Use: jigging and live-bait leaders
Panfish UL
Lines: 2-4 lb fine mono
Wraps: 7-9 each
Use: tiny guides and light drag
Steelhead
Lines: 8-15 lb mono to fluoro
Wraps: 5-7 each
Use: float leader and drift rigs
Surf Shock
Lines: 15-20 lb main to 40 lb leader
Wraps: 4 thick, 8 thin
Use: only with careful pull tests
Inshore Redfish
Lines: 10-15 lb mono to 20 lb fluoro
Wraps: 5-7 each
Use: compact leader joins
📊Common line diameter and species tables
| Rated strength | Mono diameter | Fluoro diameter | Braid diameter | Blood knot note |
|---|---|---|---|---|
| 4 lb / 1.8 kg | 0.18 mm / .007 in | 0.17 mm / .007 in | 0.10 mm / .004 in | fine wraps need patience |
| 8 lb / 3.6 kg | 0.25 mm / .010 in | 0.24 mm / .009 in | 0.13 mm / .005 in | good matched range |
| 12 lb / 5.4 kg | 0.31 mm / .012 in | 0.30 mm / .012 in | 0.16 mm / .006 in | watch braid slippage |
| 20 lb / 9.1 kg | 0.43 mm / .017 in | 0.41 mm / .016 in | 0.23 mm / .009 in | thick tags need room |
| 40 lb / 18.1 kg | 0.61 mm / .024 in | 0.58 mm / .023 in | 0.32 mm / .013 in | large mismatch risk |
| Target species | Typical line pair | Preferred ratio | Usual wraps | Strength target |
|---|---|---|---|---|
| Trout | nylon tippet to fluoro tippet | 1.0-1.4x | 6-8 each | 80-88% |
| Bass | mono main to fluoro leader | 1.0-1.6x | 5-7 each | 78-86% |
| Bonefish | tapered mono leader sections | 1.2-1.8x | 5 thick / 7 thin | 78-85% |
| Walleye | mono to light fluoro | 1.0-1.5x | 6-7 each | 78-86% |
| Steelhead | mono main to fluoro leader | 1.1-1.7x | 5-7 each | 76-84% |
| Surf fish | main mono to shock leader | 1.8-2.5x | 4 thick / 8 thin | 70-80% |
💡Blood knot calculation notes
Wrap balance: When diameters differ, count wraps by side rather than tying both tags the same. The smaller or slicker line needs extra turns so it can bite without being cut by the larger line.
On-water check: After seating the knot wet, pull against the weaker line rating with steady pressure. If the tags creep, add wraps, use longer tags, or switch to a connection better suited to braid or extreme diameter changes.
There’s nothing quite like having your leader snap off at the knot during the fight of a fish that actualy wanted to be caught. Trembling fingers reach down to inspect the carnage. A clean break through the actual line itself? Okay, bad luck. You’re a capable angler. A slip knot? A completely separated knot? Ugh. I felt frustration and embarrassment. That shouldn’t have happened.
Of all the knots used in fishing, perhaps none is more elegant than the blood knot. But it’s also unforgiving because it is a single way to tie any two lines together. You use six wraps on each side. That’s the magic number. Right? No. That’s the mistake. That’s why so many knots fails when placed under load, especially when tying together lines made from different materials and/or differing thickness.
How to Tie a Stronger Blood Knot
When you input your own line information into the top calculator, it do the rest of the work for you. No more wondering if you should use five wraps with that slick braided mainline or eight wraps with that stout fluorocarbon leader.
Too many anglers spends way too much time worrying about breaking strength and not nearly as much time thinking about diameter. Line diameter is a cold hard fact. While every brand’s line has wildly different numbers on its spool that signify “strength”, the diameter itself stays constant regardless of what any company wants to tell you.
The knot simply produces friction against coiled up line. Tie two identical pieces of nylon line together and you have symmetry helping you out. Join a thick butt section to a thin tippet section and you’ve got entirely different forces at play. If you don’t have a bunch of turns on that small diameter side, then your thinner line won’t be able to grab onto that thick backbone as well and it’s going to want to pull up into the wraps. In order to make up for the decreased surface area contact, you need to has more wraps on that smaller diameter side. This is where folks go wrong, they simply count total wraps rather than balance them out per side.
Thickness isn’t all that matters, material texture does too. While fluorocarbon can be a bit tacky when wet, and pretty slippery when dry, it’s still nowhere near as grippy as nylon monofilament. Then there’s braided line. It is very slick. It is very thin. It is very strong for its diameter. When tying a blood knot to braid, you need way more wraps than you do for mono, or else the knot will slide free under load. Those material grip properties lead to automatic changes in this tool. If you’re splicing braid to a beefier leader, you may notice a “nine or ten” wrap recommendation on one side of the splice. Seems like overkill, right? But that is just how physics works.
Wet your line and pull it tight! Patience is required here. Stacking the wraps tightly (without any messy overlap) take time.
Lastly, let’s consider tag length, something easily forgotten until it’s too late. Running out of tag end means rushing through the process and ending up with an uneven coil. Uneven coils equal weak spots. As the blood knot cinches down, it needs room to breathe. Before cutting off the excess, make sure you have enough tag length remaining, as the numbers on this page will give you a sense of what number of inches to retain. This isn’t about hoarding line, it’s about having the mechanical integrity to withstand pressure.
With a nice, even series of wraps, and by pulling gently while dressing them down, the knot tightens into a tight bundle that retains up to eighty or ninety percent of the rated line strength. It is impressively efficient if you value the forethought.
Conditions in the field are never as perfect as they are on the bench. Your line gets stiffened by cold water. Your hand gets dirty and loses some friction. And you rush and don’t pay quite so much attention. The calculator provides a starting point for perfect conditions (now go fishing). When you give your knot a gentle tug before a cast and feel like it’s loose, re-do it with an extra wrap. Better to have a bulkier knot that holds tight rather than a sleek looking knot that doesn’t. You should of trusted the geometry of the knot more than how it feels to you.
A good looking blood knot is invisible to the fish, but means everything to your confidence. Then the line pulls tight and there’s not a whisper and you know the join won’t fail until the line does. That quiet begins with getting the right number of wraps on your first attempt.