🎣 Strike Indicator Calculator
Find the perfect indicator size, depth setting & rig specs for any nymphing scenario
| Indicator Size | Diameter (in) | Diameter (cm) | Best Water Depth | Max Nymph Weight | Current Suitability |
|---|---|---|---|---|---|
| XS / Micro | 1/4 in | 0.6 cm | 0–1.5 ft (0–0.5 m) | <1 g | Still / Flat |
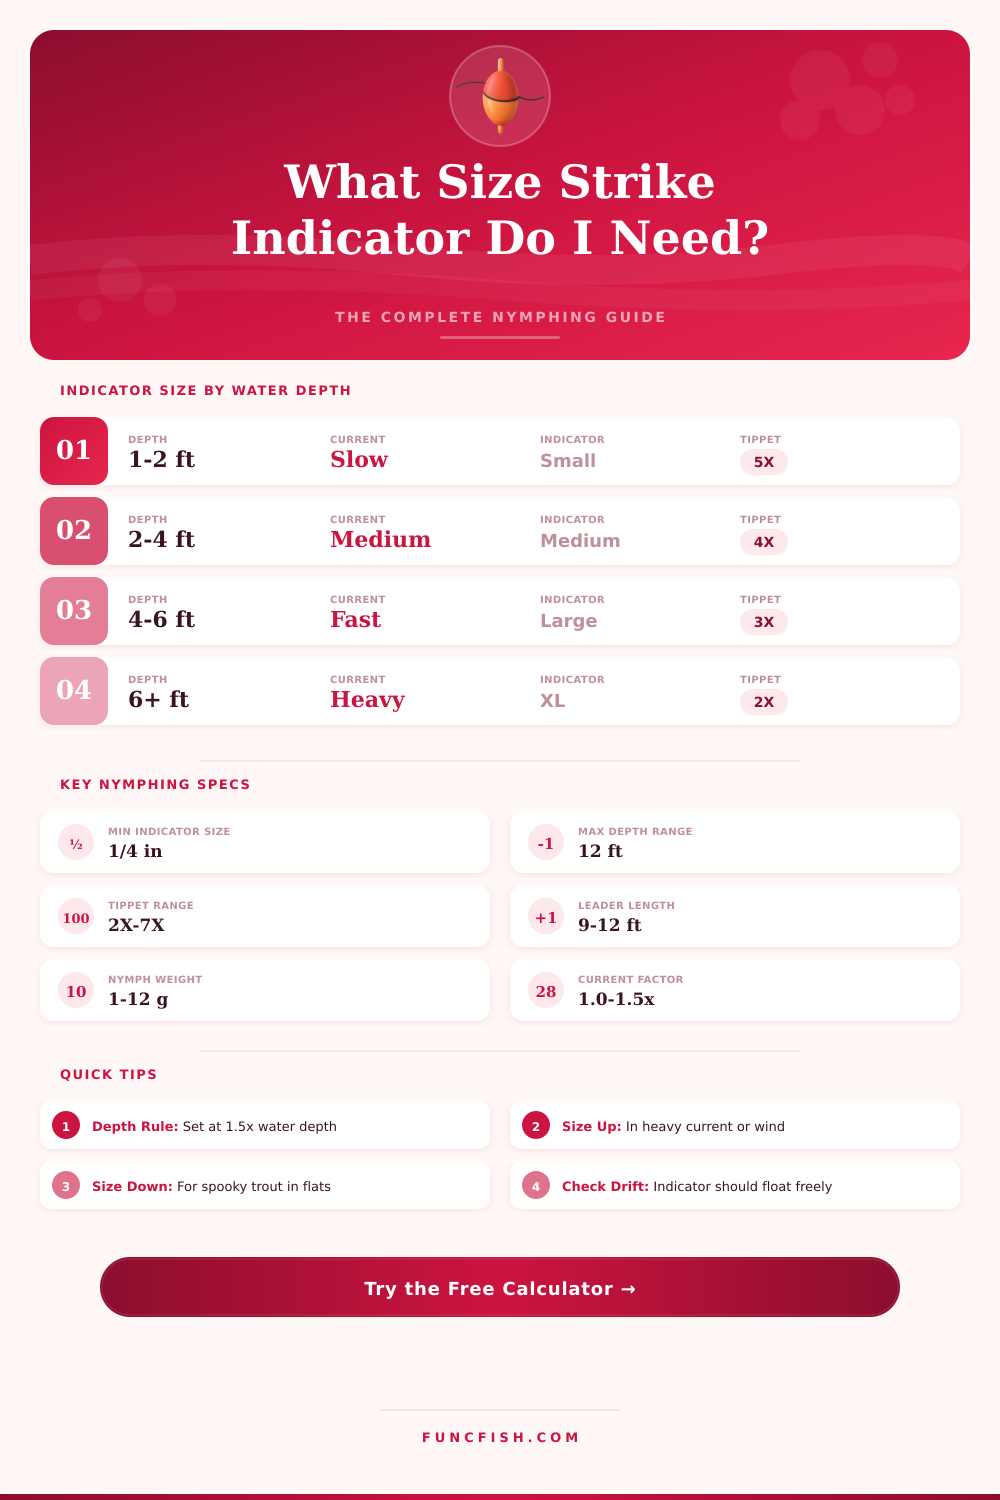
| Small | 3/8 in | 1.0 cm | 1–2.5 ft (0.3–0.8 m) | 1–2 g | Slow |
| Medium | 1/2 in | 1.3 cm | 2.5–5 ft (0.8–1.5 m) | 2–5 g | Slow–Medium |
| Large | 3/4 in | 1.9 cm | 5–8 ft (1.5–2.4 m) | 5–9 g | Medium–Fast |
| XL | 1 in | 2.5 cm | 8–12 ft (2.4–3.7 m) | 9–15 g | Fast–Heavy |
| XXL / Magnum | 1.25 in | 3.2 cm | 12+ ft (3.7+ m) | 15+ g | Heavy Flows |
| Water Depth | Indicator Position | Reason | Tippet to Nymph |
|---|---|---|---|
| 0–1 ft (0–0.3 m) | 1.0–1.2x depth | Shallow – tight drift | 12–18 in (30–45 cm) |
| 1–2 ft (0.3–0.6 m) | 1.3–1.5x depth | Allow nymph to sink | 18–30 in (45–75 cm) |
| 2–4 ft (0.6–1.2 m) | 1.3–1.5x depth | Standard drift zone | 30–60 in (75–152 cm) |
| 4–6 ft (1.2–1.8 m) | 1.2–1.4x depth | Mid-column feeding | 5–8 ft (1.5–2.4 m) |
| 6–8 ft (1.8–2.4 m) | 1.15–1.3x depth | Deep run / pool | 7–10 ft (2.1–3 m) |
| 8+ ft (2.4+ m) | 1.1–1.2x depth | Max depth range | 9–14 ft (2.7–4.3 m) |
| Species | Typical Depth | Indicator Size | Tippet | Nymph Weight |
|---|---|---|---|---|
| Rainbow Trout | 2–6 ft (0.6–1.8 m) | Small–Medium | 4X–5X | 1.5–4 g |
| Brown Trout | 3–8 ft (0.9–2.4 m) | Medium–Large | 3X–5X | 2–6 g |
| Brook Trout | 1–3 ft (0.3–0.9 m) | XS–Small | 5X–6X | 0.5–2 g |
| Steelhead | 4–10 ft (1.2–3 m) | Large–XL | 1X–3X | 6–14 g |
| Grayling | 1–3 ft (0.3–0.9 m) | XS–Small | 5X–7X | 0.3–1.5 g |
| Whitefish | 3–7 ft (0.9–2.1 m) | Medium | 4X–5X | 2–5 g |
| Panfish | 1–4 ft (0.3–1.2 m) | XS–Small | 5X–7X | 0.3–1.5 g |
| Bass | 2–6 ft (0.6–1.8 m) | Medium–Large | 2X–4X | 3–8 g |
| Type | Buoyancy | Sensitivity | Visibility | Best Use |
|---|---|---|---|---|
| Yarn | Medium | Very High | Medium | Spooky fish, clear water |
| Foam | High | Medium | High | Heavy nymphs, choppy water |
| Thingamabobber | Very High | Medium | Very High | Deep runs, heavy flows |
| Clip-On / Slip | Medium–High | Medium | High | Easy depth adjustments |
| NZ Indicator | Medium | Very High | Low–Medium | Sensitive takes, flat water |
| Air-Lock | High | High | High | Adjustable, versatile rivers |
| Oros / Wool | Medium | High | Medium | Natural presentation |
| Poly Yarn Combo | High | High | High | All-around nymphing |
A strike indicator are used to show when a fish has take the fly, and it will suspend the flies at a desired depth in the water column. If the strike indicator is too small, the shot weight or an wind will sink the strike indicator. Using a small strike indicator will make it imposible to seeing when the fish strike the fly.
If the strike indicator are too large, the strike indicator will drag on the bottom of the water column. Using a large strike indicator in clear water will spook the fish and cause them to avoid you’re flies. You want to find the more perfect balance between the strike indicator and the shot weight of the flies.
How to Pick and Use a Strike Indicator
Strike indicator made out of different material will provide different amounts of buoyancy. Yarn strike indicators will provide low profile buoyancy. This is useful in areas with calm spring creek.
Foam strike indicators will provide medium buoyancy. These are best for use in areas with mixed river flow. Cork strike indicator will provide high buoyancy for those who needs to keep their flies at the correct depth in fast or deep water.
The material you use for your strike indicator will depend on the type of water in which you are fishing. If you are fishing in spring creeks that has soft flows, you should use small yarn strike indicators so as not to disturb the surface of the water. If you are fishing in freestone rivers with faster current and seams in the riverbed, use foam strike indicator so your flies can track through the current.
In tailwaters with a steady current and significant depth, you may need to use foam or cork strike indicators to keep the flies at the correct depth in the water column. In areas with low flow in stillwater, you have more leeway in the size of your strike indicator, but you must consider how the wind will affect it. Strike indicators will work best in different types of water based off the water’s clarity.
Clear water will require smaller strike indicator so as to not spook the fish. Muddy water allow for the use of larger strike indicators. Deep waters and fast currents will increase the weight on the strike indicator.
If the depth of the water is increased, the weight that the strike indicator must hold are increased. Adding more shot to increase the depth of the flies will increase the load on the strike indicator. Using a larger strike indicator will help compensate for the increased load created by the additional shot.
The length of the leader will affect the strike indicator, especially if the leader is long. Long leaders will bow in fast currents and will pull the strike indicator off of the fishing line. The wind can also affect the strike indicator.
You can improve your fishing efforts by using the proper placement and spacing for your strike indicator. The strike indicator should be placed approximately one and a half times the depth of the water above your bottom fly. If the current is especially fast in the area where you are fishing, you should place your strike indicator more higher above the bottom of the water column.
Place your shot weight inches apart so as to not cluster the shot weights on the line. This will keep your flies drifting steady without getting too close to one another. Anglers makes several mistakes when using a strike indicator.
One of the most common mistake is using too much shot weight before increasing the size of the strike indicator. Using too much shot will bury the strike indicator in the water column. Another mistake is using too large a strike indicator in clear water.
Using a large strike indicator in clear water will spook the fish who encounters your flies. If your fishing rig stalls while fishing with a strike indicator, try to increasing the size of your strike indicator. This will reduce the drag on your flies.
You should also match the style of the strike indicator to the type of fly that you are using. Use yarn strike indicators for midges and cork strike indicators for stoneflies. There are online strike indicator calculators that will help you to determine the proper strike indicator for your fishing rig.
These calculators will ask you a few questions about the type of fly that you are using, the gram of shot that you are using, the depth of the water where you are fishing, and the speed of the current at the location. Based on these answer, the calculator will tell you the buoyancy that you need for your strike indicator. Additionally, it can also recommend the size and the placement of the strike indicator.
While these calculators can aid you in understanding the physics of your fishing rig, you will still have to spend time on the river to master how to use your strike indicator effective.