Cast Net Radius to Spread Calculator
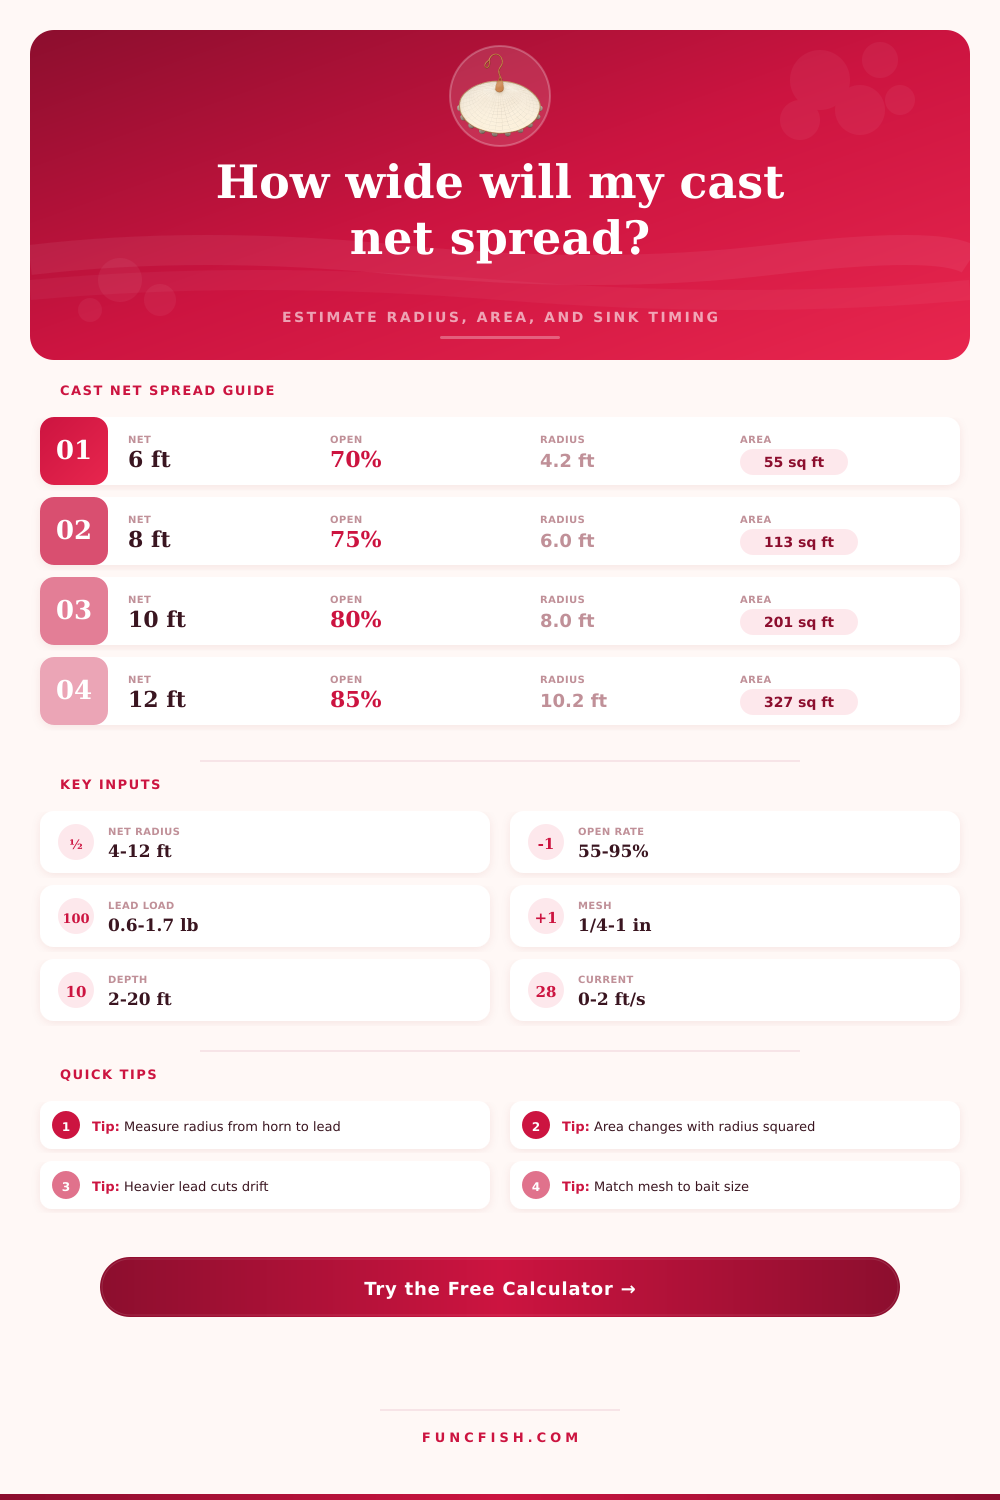
Convert net radius, opening percentage, mesh, lead load, depth, and current into a realistic spread radius, coverage area, lead-line circle, and sink window.
📌Scenario presets
⚙Cast net spread inputs
Cast net spread forecast
Calculation breakdown
📊Net build reference grid
Budget mono
Standard mono
Taped panel
Heavy lead
◯Radius, circle, and coverage table
| Advertised net radius | 70% spread radius | 80% spread radius | 90% spread radius | 80% open area |
|---|---|---|---|---|
| 4 ft / 1.2 m | 2.8 ft | 3.2 ft | 3.6 ft | 32 sq ft / 3.0 sq m |
| 6 ft / 1.8 m | 4.2 ft | 4.8 ft | 5.4 ft | 72 sq ft / 6.7 sq m |
| 8 ft / 2.4 m | 5.6 ft | 6.4 ft | 7.2 ft | 129 sq ft / 12.0 sq m |
| 10 ft / 3.0 m | 7.0 ft | 8.0 ft | 9.0 ft | 201 sq ft / 18.7 sq m |
| 12 ft / 3.7 m | 8.4 ft | 9.6 ft | 10.8 ft | 290 sq ft / 27.0 sq m |
🎯Mesh and bait matching table
| Target bait | Common mesh | Net radius range | Spread priority | Sink priority |
|---|---|---|---|---|
| Glass minnows | 1/4 in / 0.6 cm | 4-6 ft / 1.2-1.8 m | High | Low-medium |
| Shrimp | 1/4-3/8 in / 0.6-1.0 cm | 5-7 ft / 1.5-2.1 m | Medium | Medium |
| Threadfin shad | 3/8 in / 1.0 cm | 6-10 ft / 1.8-3.0 m | High | Medium |
| Pilchard | 3/8-1/2 in / 1.0-1.3 cm | 8-12 ft / 2.4-3.7 m | High | Medium-high |
| Finger mullet | 1/2-5/8 in / 1.3-1.6 cm | 8-12 ft / 2.4-3.7 m | Medium | High |
| Menhaden | 5/8-1 in / 1.6-2.5 cm | 10-12 ft / 3.0-3.7 m | Medium | Very high |
⚓Lead load and sink reference
| Lead load per radius foot | Metric equivalent | Typical sink behavior | Best water | Tradeoff |
|---|---|---|---|---|
| 0.6-0.8 lb/ft | 0.9-1.2 kg/m | Slow, easy to throw | Skinny flats | Drifts more |
| 0.9-1.1 lb/ft | 1.3-1.6 kg/m | Balanced bait-net sink | General shore or boat | Moderate fatigue |
| 1.2-1.4 lb/ft | 1.8-2.1 kg/m | Fast enough for channels | 6-12 ft water | Harder opening |
| 1.5-1.7 lb/ft | 2.2-2.5 kg/m | Deep/current oriented | Bridges and holes | Needs clean form |
🔄Spread comparison grid
Half-open throw
About 50-60% radius. Area can be under one-third of a clean pancake because radius is squared.
Three-quarter open
About 70-80% radius. Often the most repeatable working range from a boat or bank.
Full pancake
About 85-95% radius. Best area, but wind, load, and body position matter more.
Current throw
Radius may look good at splashdown while the lower lead line drifts before closure.
📘Water setting adjustment table
| Water setting | Opening effect | Sink effect | Current risk | Calculator note |
|---|---|---|---|---|
| Calm flat | Cleaner circle | Neutral | Low | Spread is the main limiter |
| Creek pocket | Reduced room | Slightly slower | Medium | Smaller nets score well |
| Beach trough | Wind-sensitive | Neutral | Medium | Lead load protects radius |
| Bridge current | Timing-sensitive | Needs speed | High | Drift trims bottom coverage |
| Deep hole | Load-sensitive | Needs fast sink | Medium-high | Sink window dominates |
Tip: A small gain in spread radius creates a much larger gain in coverage area. Improving a 7 ft spread to 8 ft raises area by about 31%.
Tip: Use the sink time with the current drift result. If bait is near bottom in moving water, a heavier or smaller net can cover better than a wider slow net.
Many anglers who use nets gets their hearts broken after that perfect circular net splashes down on top of the water and covers less than a dinner plate. Because marketing specs hardly consider the physics of sinking, drifting and opening a cast net, those measurements tell you nothing about what your net will realy do in practice. You could have an eight-foot net, but if high winds or bad casting form cause it to only open to sixty-percent of its full radius, then you’re basically fishing with five feet of spread. It’s that gap that causes most new user both pain and lost bait.
Enter the calculator. It’ll do the numbers for you and translate those abstract percentages into real square footage so you can visualize exactly how much water you’re really covering (before you raise the horn). The other piece of knowledge that realy helps understand all this is that area doesn’t grow linearly with size (radius). It grows exponentially.
Why Cast Nets Fail in Real Life
So increasing your throwing accuracy just a little bit result in a big jump in your harvest capacity. You might feel like making a better three-quarter circle throw versus a half-open throw isn’t much different mechanically, but it’s going to translate into close to double the effective area. This is why so many folks fail to grasp why we harp on getting good at snapping your wrist rather than getting bigger nets. The added weight of lead head needed to swing that extra perimeter area fight against the opening momentum you’re after. A smaller net thrown precisely will always beat a larger one thrown sloppily.
The table on the page show this: a one-foot difference in your effective radius can change amount of area covered by dozens of square feet, depending on your throwing skills. Now we look at the sink rate once the net is opened; this is when the water depth and lead load matter. Time is enemy of catching any bait. Minnows and shad are fast and won’t hang out while some fluttering net with light lead slowly sinks six feet of current. Lead lines cut better through the water and resist lateral drift but also make it significantly harder to achieve a wide opening. There is no such thing as a free lunch in this equation; you are always trading sinking speed for opening width. The tool calculates a sink window based off current and your target depth to help you find the sweet spot. In moving water like bridge piling, deep holes and so forth, you’ll probably have to sacrifice max spread for sink rate.
Another important but less obvious element is the mesh. Too big, and little baits falls right through it; too small and it impedes the rate of sinking, with no incremental improvement in catch numbers. If the mesh is properly sized, and that means stretched as tight as possible without tearing, then you’re going to be catching the species after which you’ve sized it. If they look like shad or finger mullet, most every-day nets tend to gravitate toward that mid-point of three-eighths– to one-half-inch stretch-out. That’s adequate for those average size baits (shad and finger mullet). The calculator takes that into account when computing the drag coefficient. It doesn’t factor only the lead’s weight, but also the drag imposed by the actual mesh.
The calculator above will run the math for you, translating those abstract percentages into concrete square footage so you can visualize exactly how much water you are actualy covering before you even lift the horn.
To conclude. So all this boils down to, while having the “right” bait can certainly help you catch more fish, ultimately it’s not as much of a science as it is understanding what your physical limitations are. Are you able to throw accurately enough? Can you get the net out there fast enough to keep the bait on the bottom? Is it windy? Is there current? How deep am I throwing? And so on.
These variables change from day to day. What worked best during a calm morning pond outing might be useless by the afternoon tide in a tidal creek. Think about all of these realities and adjust to match. It’ll save you some headaches and help you put yourself in position to catch more fish different than sticking with one “trick” and expecting it to work under any circumstance.
And so we return to that first photo of the ill-fated cast. Knowing exactly how far you’re capable of reaching lets you quit chasing those ghost fish and instead make planned placements with purposeful intent.