Fish Jerky Slice Thickness Calculator
Estimate raw fish strip thickness, finished dry thickness, dehydrator time, spacing, and yield from species moisture, cut direction, texture target, rack load, airflow, and marinade wetness.
📌Fish jerky presets
⚙Slice planning inputs
Use uniform, fully chilled fish and a calibrated dehydrator. This calculator estimates physical slice sizing and drying behavior; follow your food-safety process for brining, heat treatment, storage, and final moisture control.
Fish jerky slice plan
Calculation breakdown
🐟Species and material grid
Salmon
Tuna
Trout
Cod
Catfish
Mackerel
Halibut
Whitefish
📏Raw slice thickness reference
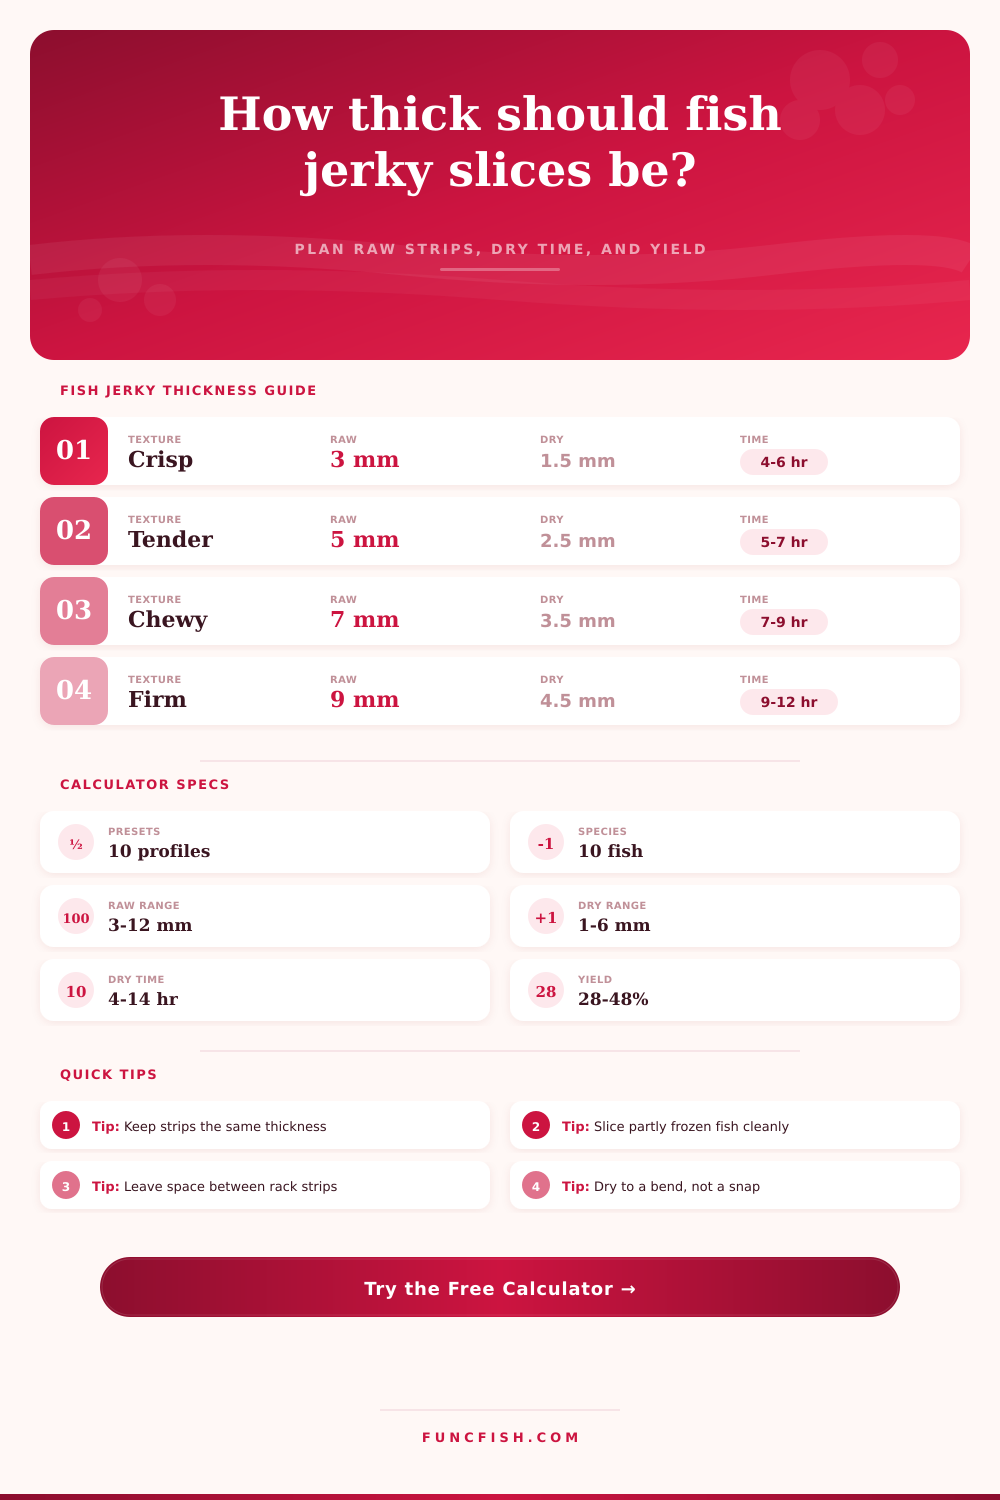
| Texture target | Raw thickness | Finished thickness | Best fish types |
|---|---|---|---|
| Crisp thin chips | 0.12-0.18 in / 3-5 mm | 0.05-0.09 in / 1-2 mm | Cod, whitefish, snapper |
| Tender bendable strips | 0.18-0.25 in / 5-6 mm | 0.08-0.12 in / 2-3 mm | Trout, salmon, walleye |
| Chewy standard jerky | 0.24-0.34 in / 6-9 mm | 0.11-0.17 in / 3-4 mm | Salmon, tuna, catfish |
| Firm dense strips | 0.32-0.45 in / 8-11 mm | 0.15-0.23 in / 4-6 mm | Tuna, halibut, catfish |
| Soft snack-style pieces | 0.25-0.38 in / 6-10 mm | 0.13-0.21 in / 3-5 mm | Oily fish and thick loins |
🌡Dryer and airflow adjustment table
| Drying setup | Airflow behavior | Time adjustment | Slice note |
|---|---|---|---|
| Stack tray dehydrator | Vertical airflow, tray rotation helps | Baseline to +12% | Keep strips under 0.30 in / 8 mm |
| Rear-fan cabinet | Even horizontal airflow | Baseline to -8% | Good for 0.25-0.38 in strips |
| Commercial dryer | Strong controlled airflow | -10% to -18% | Handles dense loads with spacing |
| Fan-assisted oven | Warmer edges and sheet-pan resistance | +10% to +22% | Use thinner strips and rotate pans |
| Low smoker drying | Smoke humidity can slow drying | +8% to +20% | Use open rack spacing |
| Screened solar dryer | Weather-dependent airflow | +25% or more | Use only thin uniform strips |
🔪Cut direction and strip shape table
| Cut style | Texture effect | Drying effect | Calculator adjustment |
|---|---|---|---|
| With muscle grain | Chewier pull | Slower center drying | Adds thickness and time |
| Across muscle grain | More tender bite | Faster moisture release | Allows slightly thicker cut |
| Bias cut strips | Balanced chew | Good surface exposure | Near baseline thickness |
| Sheet-style slab strips | Dense flexible sheets | Slowest center drying | Reduces max thickness |
| Small nugget strips | Short pieces, firm edges | Fast edge drying | Thicker allowed, less time |
🧪Marinade, salt, and loading table
| Condition | Typical effect | Thickness response | Drying response |
|---|---|---|---|
| Wet marinade cling | Surface drying delay | Cut 5-8% thinner | Add 8-14% time |
| Sugary sticky glaze | Tacky surface, slow evaporation | Cut 4-6% thinner | Add 10-18% time |
| Dry rub surface | Quick early drying | Standard thickness | Subtract 3-6% time |
| Dense full rack | Reduced air contact | Cut 6-10% thinner | Add 15-25% time |
| High salt cure | Firmer, faster water release | Can hold 3-5% thicker | Subtract 4-8% time |
| Low-sodium marinade | Slower water draw | Cut 3-5% thinner | Add 5-10% time |
💡Thickness planning tips
Uniformity: Sort fish strips by thickness before drying. A mixed rack usually forces the thinnest pieces past the desired texture while the thickest pieces finish.
Rack spacing: If strips touch after the first hour, treat the rack as crowded and shorten the next batch by one thickness step or add tray rotation.
When you buy that thick slab of salmon, you carefully trim it up then slice it. What do you want? Do you want a limp mess or dry leather? Or do you want something with just the right chew?
When it comes to fish jerky, thickness is everything. The one number that makes all the difference are the “raw slice thickness.” This is a measurement of exactly how thin your slice is when it goes on the dehydrator tray. From there, it’s about time under the heat; weight loss; and bendiness vs snapiness.
The Fish Jerky Thickness Calculator
But most folks don’t do that; they just guess. Slice away, eyeball when things seem about even and hope for the best. Bad idea; fish are not all created equal. Oily mackerel is not the same than a dense halibut loin.
Enter the calculator, which does the math for you after you enter your species and target texture. You no longer has to guess at shrinkage rates and moisture loss coefficients. Enter your actual inputs, such as how salty your brine is. How much air is your dehydrator moving?) and let it translate those into a plan. You provide the inputs, what kind of fish are you starting with? How salty is your brine? How much air will your dehydrator move? It’ll tell you exactly how thick your meat should of being sliced so that it dries within the window you desire.
What about the grain? When we cut along the grain we get a stronger strip that can handles extended drying time. Cutting across the grain result in a more tender bite, even if it is in a thinner slice so that the center does not become soggy. The direction is accounted for in the tool. A cross-grain cut will result in a slightly lower recommended raw thickness. This is because it takes less time for the heat to reach all the way through without becoming too brittle on the outside. It is just enough difference to prevent common mistake of having a piece with crispy edges and a raw middle.
Species also vary greatly in their moisture levels. Whitefish contain more water than lean fish such as tuna. As a result, they’ll shrink less, though they will dry out quicker if cut too thinly. The tool’s presets account for these biological variations. If you choose a lean fish profile, it will start from a lower moisture baseline. That makes a huge difference in terms of the yield calculation. You may think you’re going to lose half your weight, but with lean fish, you tend to keep most of the weight. Knowing that will save you from disappointment. You won’t weigh something out and end up with only 6 ounces of product when you expected a pound of jerky.
The silent driver is airflow. A stack-tray dehydrator recirculates air vertically; a crowded tray becomes an obstacle to airflow which can result in inconsistent drying. That’s why the calculator prompts you for rack loading density. Obstructed airflow means there’s no way out for air. Air stagnates near moist areas of the fish. That prolongs drying but inconsistently. If you say that trays is loaded densely, the tool will suggest a thinner raw thickness. In bad airflow scenarios, thin slices dry quicker.
Batch size versus consistency is another tradeoff. Another level of complication comes from the marinade. The sticky surface of sugary glazes will slow the drying process as well, sealing in moisture first. And the water weight of wet marinades does the same; even if not because of the sugar content. The tool factors in how wet the surface is and makes an adjustment to the estimated time. Pick a sugary glaze? Expect longer drying times. Maybe you could slice it a little thinner to make up for the surface barrier. That’s where most folks get tripped up, they look at the inside moisture of their fish but forget about the stuff on top of it.
Great jerky comes down to managing expectations. Physics is what they are. There’s no way around the evaporation time. While the tool will get you started, look to your eyes and nose as your last line of quality control. Seek the bend, not the snap. A good piece will flex without breaking. It’ll break if it’s too dry or too thin. It’ll be limp if it’s too thick or if there isn’t enough air flow. Take the calculated thickness as a starting place and tweak from there depending on what actualy happens with that particular batch.
What you’re looking for is consistency. When you dial in the thickness on a given batch, you know exactly how to make the next batch. That’s where you go from guessing to craft.