Pole Top Kit Length Calculator
Estimate fish-ready top kit length, elastic cut length, puller reach, connector allowance, and section trim for pole fishing top kits.
📌Scenario presets
⚙Top kit inputs
Top kit length results
Calculation breakdown
📊Top kit equipment data
Match Top 2
Match Top 3
Power Top 3
Top 4 Kit
🐟Species and gear comparison
Roach and Rudd
No.3-6Short match top 2 or light top 3, soft tension, small connector, low reserve.
Skimmers and Bream
No.5-10Match top 3 or top 4 gives stable rig depth and smoother netting control.
F1s and Tench
No.10-14Puller top 2 or power top 3 with balanced stretch and medium reserve.
Margin Carp
No.14-18Big bore power kit with firm tension, short puller path, and high reserve.
📘Reference tables
| Kit style | Common sections | Uncut range | Trim range | Usual elastic |
|---|---|---|---|---|
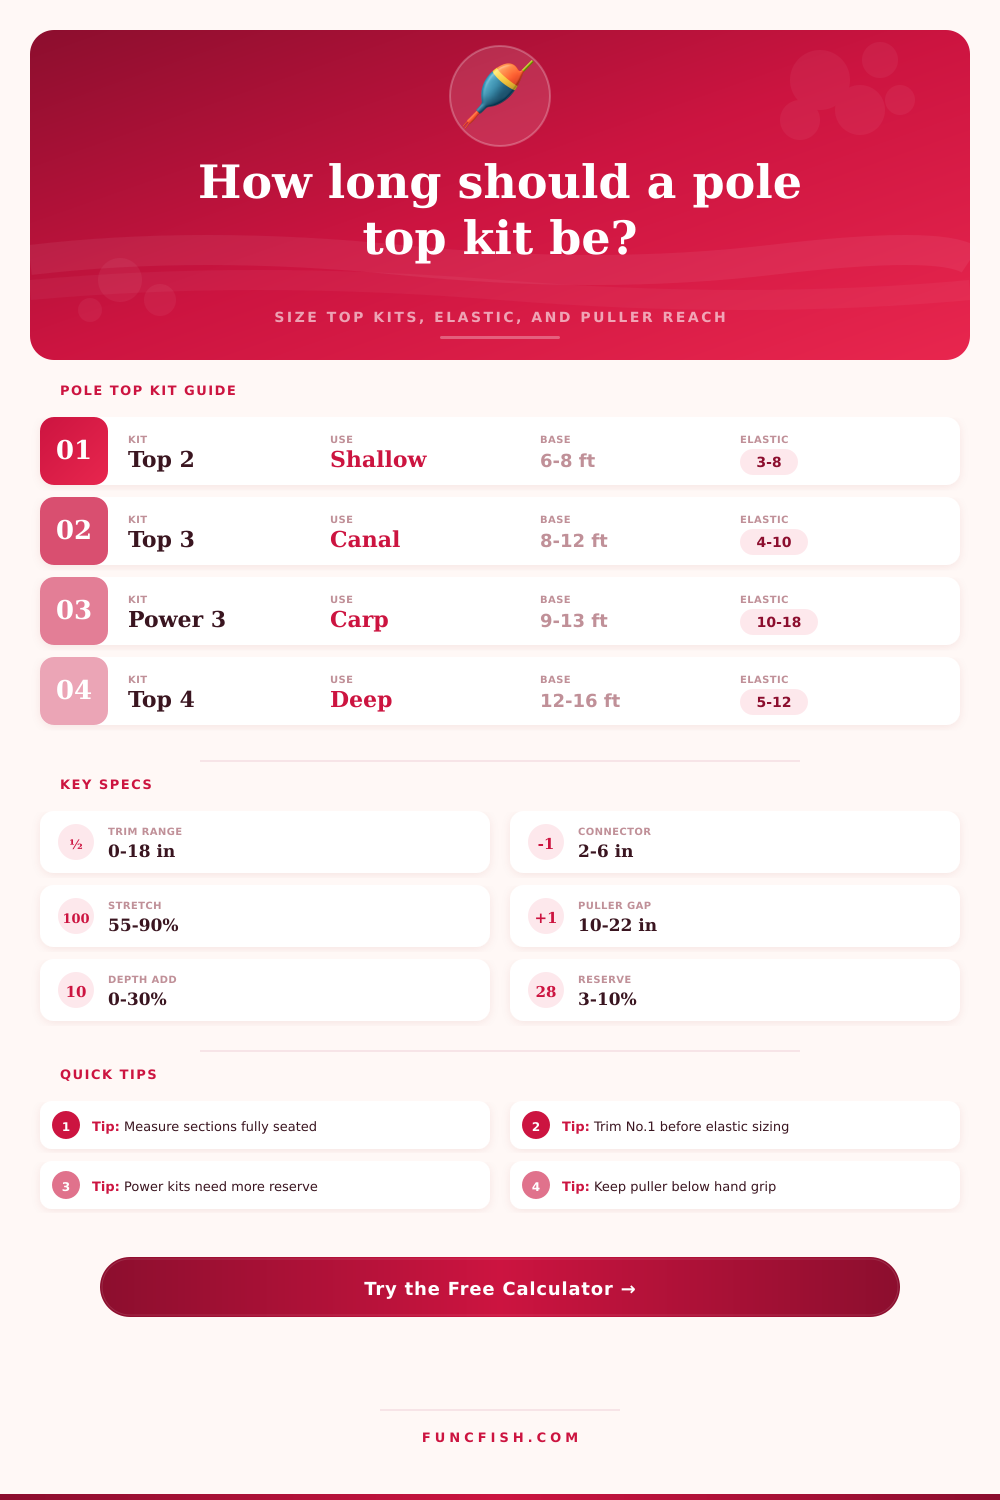
| Match top 2 | No.1 plus No.2 | 5.8 to 7.2 ft / 1.77 to 2.19 m | 0 to 10 in / 0 to 25 cm | Solid No.3 to No.8 |
| Match top 3 | No.1 to No.3 | 8.8 to 10.8 ft / 2.68 to 3.29 m | 2 to 12 in / 5 to 30 cm | Solid No.4 to hollow No.10 |
| Power top 2 | Big bore No.1 plus No.2 | 5.5 to 6.9 ft / 1.68 to 2.10 m | 4 to 16 in / 10 to 41 cm | Hollow No.10 to No.16 |
| Power top 3 | Big bore No.1 to No.3 | 8.4 to 10.2 ft / 2.56 to 3.11 m | 4 to 18 in / 10 to 46 cm | Hollow No.12 to No.18 |
| Top 4 kit | No.1 to No.4 | 11.8 to 14.2 ft / 3.60 to 4.33 m | 0 to 12 in / 0 to 30 cm | Solid No.5 to hollow No.12 |
| Cupping top 3 | Stiff No.1 to No.3 | 8.0 to 9.8 ft / 2.44 to 2.99 m | 0 to 6 in / 0 to 15 cm | Usually not elasticated |
| Elastic class | Typical diameter | Practical fish range | Stretch setting | Top kit note |
|---|---|---|---|---|
| Solid No.4 | 0.8 to 1.0 mm | 2 oz to 12 oz / 60 to 340 g | Soft, 0.90 factor | Longer light kits reduce bump-offs |
| Solid No.6 | 1.0 to 1.2 mm | 4 oz to 1.5 lb / 110 g to 0.7 kg | Soft or balanced | Good canal and winter lake choice |
| Solid No.8 | 1.2 to 1.4 mm | 8 oz to 3 lb / 0.23 to 1.36 kg | Balanced | Mixed silverfish and bonus skimmers |
| Hollow No.10 | 1.6 to 1.8 mm | 1 to 5 lb / 0.45 to 2.27 kg | Balanced or firm | F1 and small carp top kits |
| Hollow No.12 | 1.8 to 2.0 mm | 2 to 7 lb / 0.91 to 3.18 kg | Firm | Commercial carp puller kit |
| Hollow No.14 | 2.0 to 2.2 mm | 3 to 10 lb / 1.36 to 4.54 kg | Firm or bagging | Power top 2 or big bore top 3 |
| Hybrid No.16 | 2.2 to 2.4 mm | 5 to 14 lb / 2.27 to 6.35 kg | Bagging | Margin work with high reserve |
| Hollow No.18 | 2.4 to 2.6 mm | 7 to 18 lb / 3.18 to 8.16 kg | Bagging, short kit | Heavy carp and snag control |
| Scenario | Recommended kit | Ready length target | Puller position | Reserve level |
|---|---|---|---|---|
| Canal roach | Match top 3 | 8.5 to 9.8 ft / 2.59 to 2.99 m | No puller or 18 in / 46 cm | Low to normal |
| Winter lake silvers | Match top 2 or 3 | 6.0 to 9.2 ft / 1.83 to 2.80 m | No puller | Low |
| Commercial F1 | Puller top 2 or 3 | 6.0 to 9.0 ft / 1.83 to 2.74 m | 12 to 18 in / 30 to 46 cm | Normal |
| Open water carp | Power top 3 | 8.0 to 9.7 ft / 2.44 to 2.96 m | 10 to 16 in / 25 to 41 cm | Normal to high |
| Margin carp | Power top 2 | 5.0 to 6.5 ft / 1.52 to 1.98 m | 8 to 14 in / 20 to 36 cm | High or snaggy |
| Deep bream | Top 4 kit | 11.5 to 13.5 ft / 3.51 to 4.11 m | 16 to 22 in / 41 to 56 cm | Normal |
| Adjustment | Light elastic | Medium elastic | Heavy elastic | Calculator effect |
|---|---|---|---|---|
| Soft setting | Best for No.3 to No.6 | Use for cold F1 bites | Usually too slow | Longer cut, smoother stretch |
| Balanced setting | Still forgiving | Default mixed fish setup | Open water carp | Base cut factor |
| Firm setting | Risk of bumped fish | Positive F1 landing | Carp control | Shorter cut, faster response |
| Bagging setting | Not advised | Fast commercial work | Margin and shallow carp | Shortest cut, highest reserve |
💡Top kit length notes
Trim before elastic sizing: the No.1 cut changes both the finished pole reach and the internal elastic path. Measure the kit after the bush or connector fit is decided.
Use puller path, not kit length alone: a puller slot placed too close to the butt leaves little working elastic. The calculator flags that by comparing slot-to-tip path with target fish load.
It’s when we’re standing on the bank, half building a kit, and you don’t know what you want your skimmer line to feel like yet. Too hard and you can’t cushion a skimmer, too soft and the carp shakes the hook off. That’s a special kind of panic. But that’s normaly just at the start of the session; the time when the geometry of your top kit need to be understood.
A top kit is more than reach. It is a series of levers that creates mechanical advantage. This control the force at the end through the stretch of material and the distance over which it acts. If done wrong you’ll snap lines or bump fish. Get it right and you let the pole do its job and concentrate on position and feeding.
How to Set Up Your Pole Fishing Kit
When you enter your section length, amount of trim, and type of elastic, the calculator does all the math for you (above). It spares you having to guess what coefficient to use because it’s either solid or hollow rubber. Enter your actual gear specs and it shows how your gear will perform under load.
A common mistake is using the uncut kit as a starting point and thinking you have that much to work with. You don’t. The tip trim affects the balance point, and the connectors also eat up inches. Your elastic path calculation won’t include the amount of overlap at each joint if you don’t plan for it. That’s why the tool separates out connector allowance and total section overlap. These little losses add up quickly. Two inches of hidden overlap + three-inch connector = five fewer inches of what the raw tape measure says you have to work with. When you’re trying to land a fish in a tight spot, it makes a difference.
The other area of confusion is with sizing. Most folks will purchase the skinniest elastic they can get away with hoping it’s stretchy. That doesn’t usually work out well. Solid cord memory is different than hollow sized elastic. Even though they may appear identical on the store shelf, a No.6 solid cord behave totally unlike a No.10 hollow strand. Regardless of what size or type you use, your stretch setting (firm for quick commercial fishing vs. Soft for long runs for wintertime silvers) is also considered by the calculator and makes a big difference in cut length required. Shorter cuts are needed for firm settings to provide more immediate resistance when fish run. Longer lengths are necessary for soft settings so tension can build more slowly along the path of elastic.
Take the puller slot location for example. Too far back and you have no working elastic left when the fish runs hard. Too far back, and there’s no way you’re stopping the burn because you’ve got all this loose line wrapped around your hand. How do you know if you’ll be safe? Well, the tool will tell you distance from the end of the rod to your puller slot. That’s how much distance you have for shock absorption without fouling up.
Another depth consideration is that being quieter is still important. To get something swimming deeper you need a longer top kit so it will stand up and present the hookbait properly. But a longer kit is heavier. This weigh down the pole, making it uncomfortable to hold or cast far. So there’s this balancing act of range versus fatigue.
The numbers on the page are typical ranges based on various size fish. This gives you some idea where your set-up fits into normal match practice.
The number one tip is frequently forgotten about in terms of trimming. That should be the first choice. Cutting two inches off changes the sensitivity and the swing of the float. Take a measure of that cut before settling on amount of elastic. By following this order when using the tool, your results will reflect what it is actualy like when you go fishing.
That’s not hard to overthink. There’s no requirement for custom-molded parts and rare materials. It’s just a sensible rig that suits the target species. Fishing for carp on the margins isn’t the same as a roach fishery in canals. And those who’ve fished long enough to develop the feel intuitively have had their experience written down; their hunches turned into repeatable specifications.
So looking at the results, what should we pay attention to? Look at the reserve level. Then look at the load rating. That will let you know whether or not you’ve got too much cushion for expected weight. Too little and tighten that elastic or shorten the cut. Too much and maybe you’re slowing the fast feed of the fish. It’s kind of a balancing act. Maximum strength is not the goal. Maximum control with minimum fuss is the goal.
When we have confidence in our equipment standing at the end of the dock waiting to go is different. We are focused on the next cast not the next big one. Knowing your numbers work gives us that confidence. Now the pole isn’t a bunch of parts fighting each other, it’s an extension of our arm. Trim carefully, start with the basics and let the elastic do its job.