Controller Float Distance Calculator
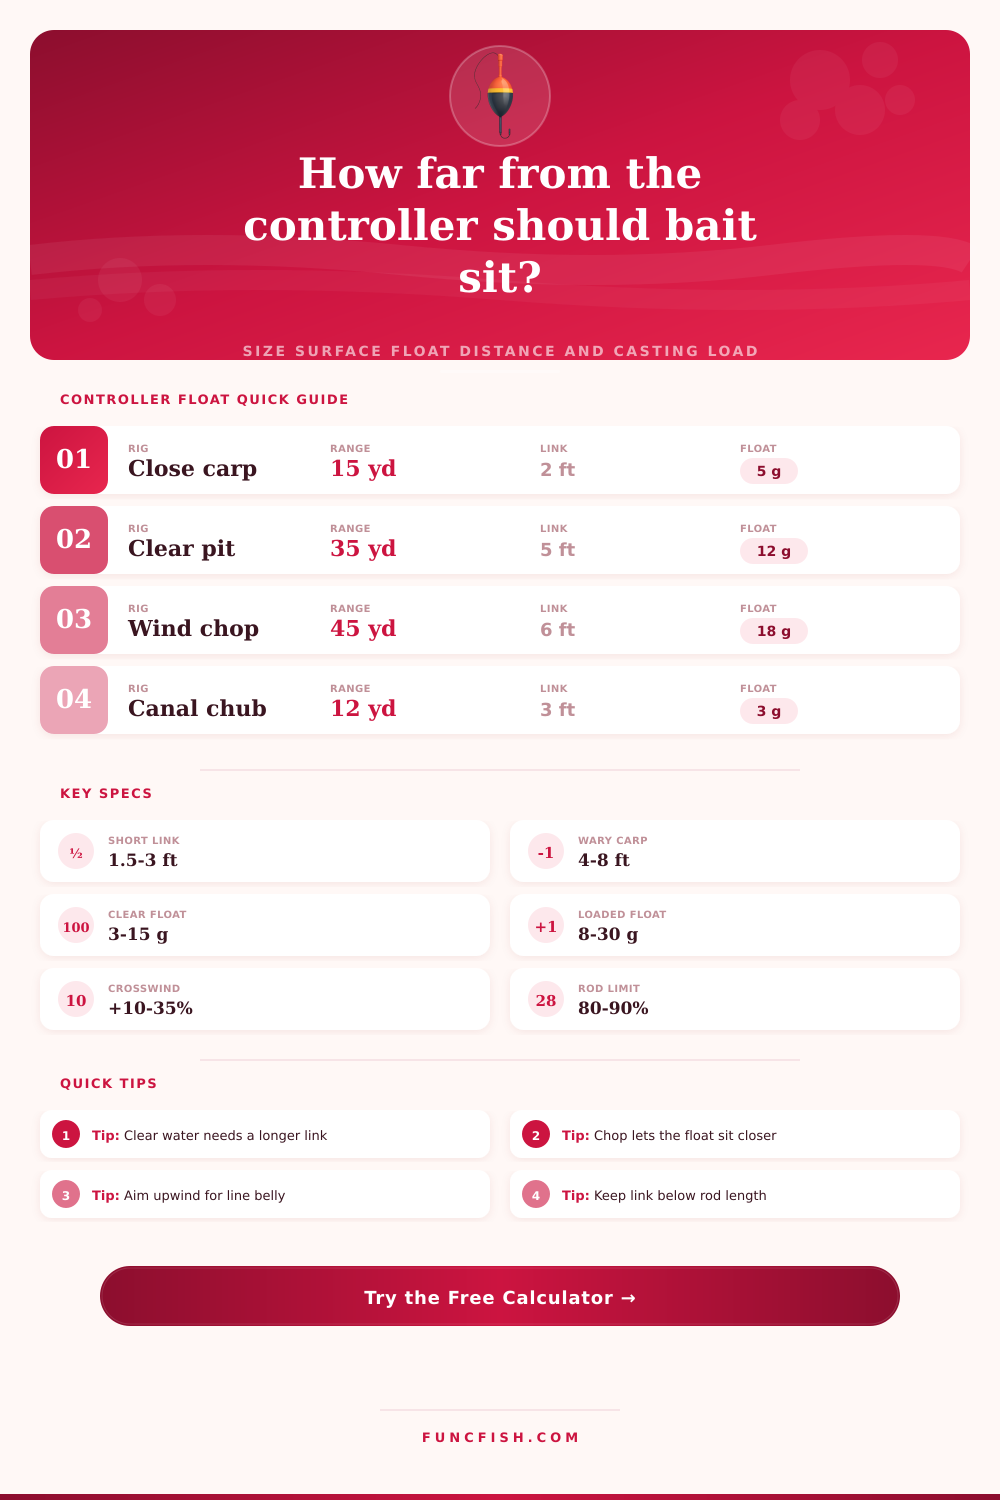
Estimate the distance from controller float to hookbait, the loaded float weight needed to reach the swim, the upwind aiming offset, and whether the finished rig stays inside your rod handling limit.
📌Surface Rig Presets
⚙Controller Float Inputs
Controller Float Distance Results
Formula Breakdown
🛠Controller and Line Data Grid
📏Controller Float Size Reference
| Controller Type | Typical Loading | Useful Range | Float Visibility | Best Match |
|---|---|---|---|---|
| Small clear inline controller | 3-8 g / 1/10-1/4 oz | 8-25 yd / 7-23 m | Very low | Margin carp, chub, calm canals, stalking near cover |
| Distance surface controller | 10-25 g / 3/8-7/8 oz | 25-60 yd / 23-55 m | Medium | Open lake carp, clear pits, long freebies line |
| Half-filled bubble float | 4-14 g / 1/8-1/2 oz | 10-40 yd / 9-37 m | Low to medium | Trout flies, small crust, light lure presentation |
| Water-filled bubble float | 10-30 g / 3/8-1 oz | 30-70 yd / 27-64 m | Medium | Windy open water, long casts, surface tow control |
| Loaded pellet waggler | 4-16 g / 1/8-5/8 oz | 12-45 yd / 11-41 m | High | Commercial carp, pellets, repeated match casting |
| Foam or balsa controller | 5-15 g / 3/16-1/2 oz | 15-40 yd / 14-37 m | High | Choppy water where seeing the controller matters |
🐟Species and Rig Comparison Grid
Wary Carp
4-8 ftUse clear controllers, low-visibility hooklink, and extra distance when fish flare away from the splash.
Confident Carp
2-5 ftShorter links cast cleanly and keep the bait close to the feed when fish are competing hard.
Canal Chub
2.5-5 ftCrust and bread rigs usually need a soft landing and a clear gap from the float shadow.
Trout Bubble
4-9 ftSmall flies and nymphs often fish best with a long leader, especially in clear stillwater.
📊Recommended Bait-to-Controller Distance Table
| Situation | Starting Separation | Increase When | Reduce When | Handling Note |
|---|---|---|---|---|
| Close margin carp under the rod tip | 1.5-3 ft / 0.45-0.9 m | Fish back away from controller swirl | Pads, branches, or short underarm casts limit rig length | Keep below half the rod length for accurate dropping |
| Clear gravel pit carp at range | 5-8 ft / 1.5-2.4 m | Flat calm, clear bottom, visible fish tracking the float | Crosswind makes the bait wrap around the float | Side cast or pendulum cast when over 80% rod length |
| Wind ripple on open water | 3-6 ft / 0.9-1.8 m | Surface tow pushes line into the bait first | Chop hides the controller and fish are competing | Aim upwind and mend before tightening to the float |
| Canal chub with crust or biscuit | 2.5-5 ft / 0.75-1.5 m | Low bridge shade, clear shallows, wary fish | Tight swims or overhanging branches reduce casting room | Soft mono or copolymer helps the bait drift naturally |
| Bubble float with fly or nymph | 4-9 ft / 1.2-2.7 m | Trout inspect the bubble or water is very clear | Short rod or bankside cover makes casting unsafe | Use a lighter fly if turnover collapses at the end |
| Pellet waggler surface carp | 1-3 ft / 0.3-0.9 m | Fish follow feed but refuse hookbait beside the float | Repeated casting rhythm and tight feeding accuracy matter | Short links improve recovery and fast recasting |
🌊Condition Adjustment Reference
| Condition | Distance Effect | Float Weight Effect | Practical Adjustment | Calculator Factor |
|---|---|---|---|---|
| Flat calm, high visibility | Longer bait gap | Small increase for accuracy | Add separation before adding float size | Clarity factor rises above 1.00 |
| Light ripple or chop | Shorter bait gap | Moderate loading helps turnover | Fish closer to the float if bites are confident | Chop factor falls toward 0.90 |
| Crosswind across the swim | Needs upwind aim allowance | Higher controller load | Cast above the target and mend slack early | Wind load adds 1.8% per mph |
| Surface tow or current | Bait lands down-tow from float | Little direct loading effect | Allow drift before the line tightens | Tow offset scales with cast range |
| Heavy hookbait windage | Needs cleaner turnover | Higher loading to pull bait straight | Feather the cast and stop the spool late | Hookbait factor up to 1.26 |
💡Controller Float Calculation Tips
Separation check: If fish take freebies but refuse the hookbait, increase the hookbait-to-controller distance first. If the rig tangles or turns over badly, shorten it until the bait lands straight, then step up controller loading only as needed.
Wind check: A crosswind does not just shorten casting range. It bows the main line, drags the controller, and makes the bait settle downwind, so the aim-upwind offset is often more useful than simply choosing a heavier float.
It’s about being somewhere where there’s a bag of free feed in your hand and a rod in the other while standing on the bank looking at tempting water but seeing carp half-a-mile away spotting a coin-sized shadow. In-between stealth and visibility lies controller float fishing, too little weight won’t get the bait anywhere near the carp but too much will spook them before there nose reaches the bait. It’s all about psychology and aerodynamics.
Get it right and you take bites you can’t even see, get it wrong and you miss them. “Separation distance is key. When your hookbait touches down directly beside your float, the splash spooks nervous fish. But when it’s too far back there, it drags bait unnaturally on the surface.”
How to Fish for Carp Like a Pro
Thankfully, you don’t have to guess if three feet or six feet is optimal in clear water; the calculator does all math when you describe your situation. After inputting details such as fish pressure and water clarity, it’ll automatically adjust suggested separation distance.
For example, you could probably slide away with a tight link in dirtier canal water where sediment obscures the float. But in crystal-clear gravel pits, that same close link would be a telltale beacon of danger. It’ll let you know exactly how much space you should maintain to keep bait drifting naturaly. This helps keep it out of fish’s immediate line of sight.
The other confusing one is float weight. Adding weight to your float makes it throw farther, right? But then it also make a bigger splash when it lands. So having too much lead on your float makes it smack down on the water like a rock, even though you need enough weight to overcome air resistance and surface tension. They list combinations on the page and show how many different types of floats exist to match them all in terms of float type versus range.
And note what happens with cross wind? Cross winds do not simply force the float forward. Instead, they bow the line, creating drag that pulls the bait out of position. That’s where going upwind helps more than adding grams to your lead.
Everything else about the rig setup follow water clarity. When visibility drops below two feet, the fish sense it more by feel and smell than vision. In that case, you can use shorter leaders, small floats, and tackle that blends into murky water. Above that, the margin of error diminishes. Anything with much of a silhouette will be noticed. A large, bright float becomes a danger signal, and a heavy main line becomes a trip wire. That’s when clear inline controllers and low-visibility copolymers make their mark. They lessen the rig’s silhouette so the bait looks detached instead of attached to a glaring piece of intruder.
The tool accounts for that by changing distance between baits based off how far you can see into the water. There’s also a strict physical boundary placed on your choices by the length of the rod. For example, if you have a 12-foot rod, then a 10-foot leader won’t work on that rig because you’re going to end up with turnovers and tangles that ruin presentation. To make an overhead cast cleanly, you must be able to maintain control over all of the terminal tackle. That’s why open-water fishing demands longer rods that can accommodate the extra reach from bait to tip, but margin fishing often use shorter rods with more compact rigs.
The calculator takes this restriction into account for you; warning when your desired separation exceeds what you could of comfortably manage. It keeps you from tying on a sweet-looking rig only to then watch it tie itself into knots upon launch.
The other wrinkle is surface chop. It hides the float from below. That should be good for stealth, but it also masks your line from above, so bites are less detectable. Often in the wind you’d prefer to be sitting on top of the float and feeling your way along with the take instead of waiting for a slight shift at the end of the float up against the rod tip. You can’t easily measure the trade off between visual vs tactile masking, but the tool helps tweak drift allowances and aim offset based on this. And it keeps reminding you it’s not just about casting difficulty, it’s about changing the bait’s settling point in wind.
In the end though, surface fishing is all about overcoming fears of educated, pressured fish. Whether it’s weight on the float hiding from view or the bait getting to where it needs to be, every component of the rig plays some role there. Adjust the separation until the bait looks natural, then trim the float weight until the cast feels effortless. Sometimes it’s just a little bit. But it makes a difference.
Get that distance right and a frustrating day becomes a constant series of bites. This is a reminder that sometimes the best tackle isn’t tackle at all; it’s the tackle you can’t see.