Fishing Rod Tip Diameter Calculator
Convert a measured blank tip into the nearest tip-top tube size, adjust for cut-back taper, finish build, adhesive clearance, and choose a ring size that matches line and leader knots.
📌Scenario presets
⚙Tip-top sizing inputs
Tip-top fit recommendation
Calculation breakdown
📊Tube size quick grid
Size 4.0
Size 5.0
Size 6.0
Size 8.0
📏Rod tip tube reference table
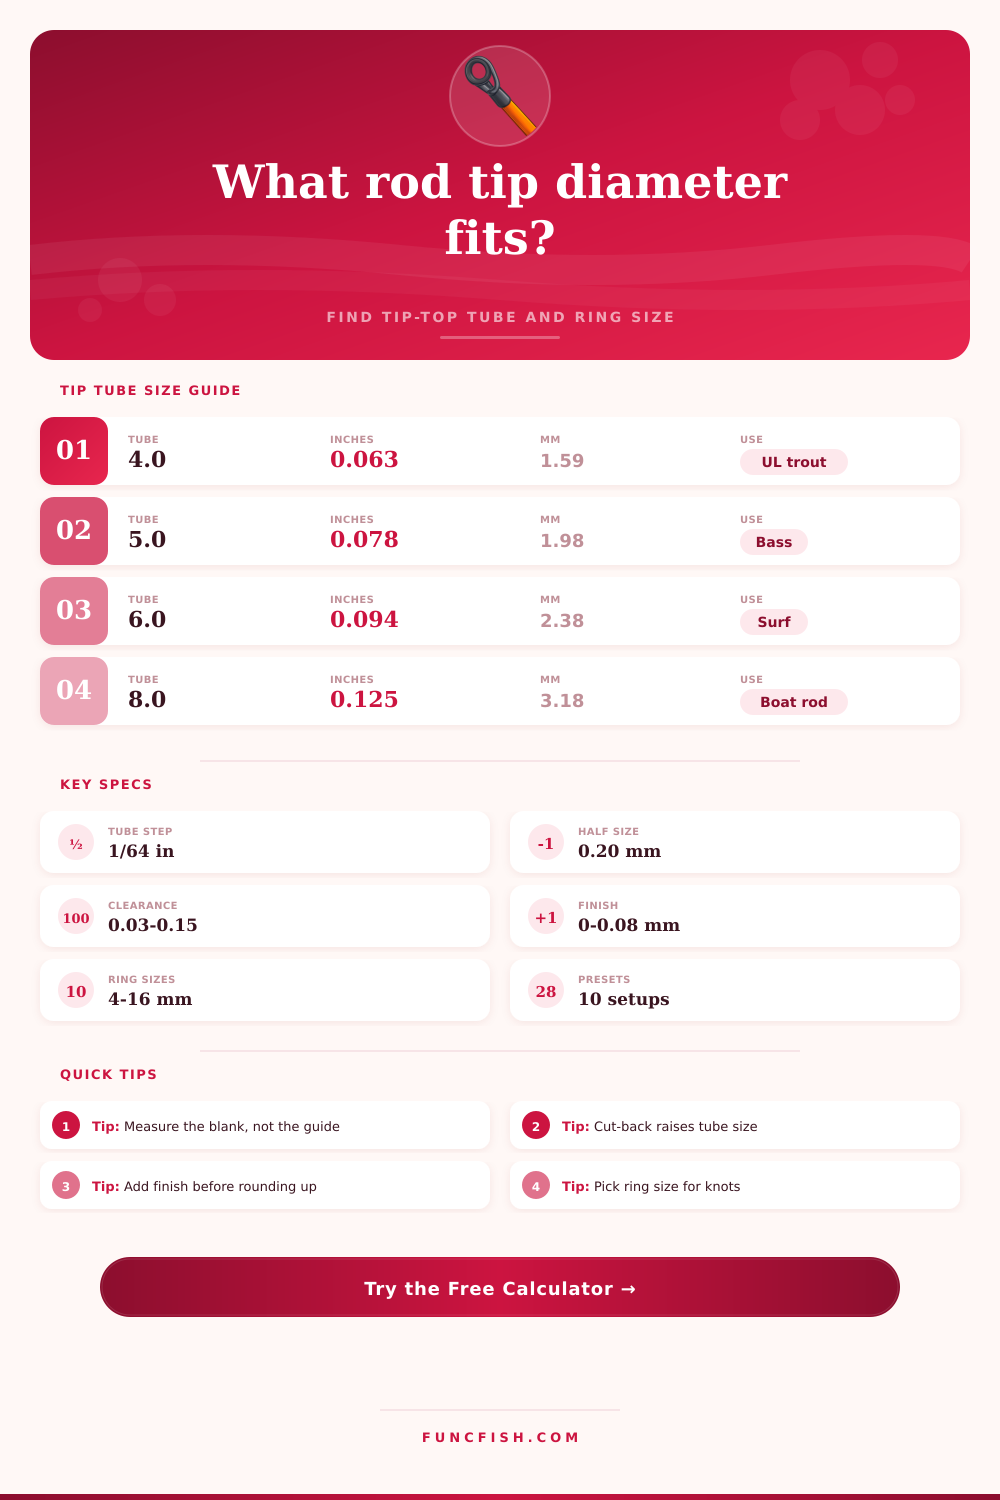
| Tube size | Nominal ID inches | Nominal ID mm | Typical rod class | Fit note |
|---|---|---|---|---|
| 3.5 | 0.0547 in | 1.39 mm | Ultralight ice / fly | Small blanks only; check glue clearance carefully |
| 4.0 | 0.0625 in | 1.59 mm | Ultralight trout | Common for slim graphite and glass tips |
| 4.5 | 0.0703 in | 1.79 mm | Light spinning | Useful half step for finesse builds |
| 5.0 | 0.0781 in | 1.98 mm | Medium freshwater | Common bass and walleye range |
| 5.5 | 0.0859 in | 2.18 mm | Medium-heavy casting | Often fits trimmed medium blanks |
| 6.0 | 0.0938 in | 2.38 mm | Heavy freshwater / surf | Good for larger freshwater and shore rods |
| 7.0 | 0.1094 in | 2.78 mm | Surf / salmon / catfish | Choose ring size for knots and shock leaders |
| 8.0 | 0.1250 in | 3.18 mm | Boat / offshore light | More adhesive clearance may be needed |
| 10.0 | 0.1563 in | 3.97 mm | Heavy boat | Large tube; confirm blank OD with calipers |
| 12.0 | 0.1875 in | 4.76 mm | Stand-up / trolling | Often paired with larger rings or rollers |
🎣Species and rod setup reference
| Setup | Line range | Likely tube | Ring range | Calculator cue |
|---|---|---|---|---|
| Panfish / trout ultralight | 2-6 lb / 0.9-2.7 kg | 3.5-4.5 | 4-5 mm | Keep ring light, avoid oversized glue gap |
| Bass finesse spinning | 6-12 lb / 2.7-5.4 kg | 4.5-5.5 | 4.5-6 mm | Leader knots usually drive ring size |
| Walleye jigging | 6-14 lb / 2.7-6.4 kg | 4.5-5.5 | 5-6 mm | Slim tube helps keep the tip crisp |
| Bass power casting | 12-25 lb / 5.4-11.3 kg | 5.0-6.5 | 5.5-7 mm | Choose extra clearance for braid leaders |
| Catfish bottom rod | 20-50 lb / 9-23 kg | 6.0-8.0 | 8-12 mm | Shock, sinker weight, and knots matter |
| Surf casting rod | 20-60 lb / 9-27 kg | 6.0-9.0 | 10-16 mm | Shock leader knots need clear passage |
| Pike / muskie casting | 30-80 lb / 14-36 kg | 6.0-9.0 | 7-12 mm | Wire and heavy braid favor larger rings |
| Offshore trolling | 50-130 lb / 23-59 kg | 8.0-12.0 | 10-16 mm | Tube fit and frame strength both matter |
⚖Clearance and sizing table
| Fit style | Clearance inches | Clearance mm | Best use | Watch point |
|---|---|---|---|---|
| Snug hot-melt | 0.001-0.003 in | 0.03-0.08 mm | New builds with exact caliper readings | Too tight can scrape finish or split thin tips |
| Standard build | 0.003-0.006 in | 0.08-0.15 mm | Most freshwater rods | Round up when between half sizes |
| Field repair | 0.005-0.009 in | 0.13-0.23 mm | Replacing a broken or unknown tip | Excess gap needs more adhesive support |
| Epoxy sleeve | 0.007-0.012 in | 0.18-0.30 mm | Large saltwater or boat tips | Do not oversize enough to create wobble |
💡Calculation notes
Measure the blank at the final install point. If you cut back a broken rod tip, the new end is usually wider, so the calculator adds taper before rounding to the next tube size.
Tube size and ring size solve different problems. The tube fits the blank outside diameter, while the ring must clear line, leader knots, ice, debris, and casting load.
Selecting a tip-top for a custom rod build is a technical process. When you select the tip-top for your custom rod, you must ensures that it is the correct tip-top for the rod that you are building. The tip-top for a custom rod consist of a tube and a ring.
The tube must slide over the rod blank without forcing it onto the blank; forcing the tube onto the blank will damage the rod blank. Additionally, the ring must allow the fishing line and knots to pass through the ring. If the custom rod will be used in cold conditions, the ring must also allow ice to pass through.
How to Choose and Fit the Right Tip-Top for Your Custom Rod
If you choose the wrong tip-top for your custom rod, then the tip-top will wobble or it will bind to the rod blank. This will negatively impacts the way in which the rod will load when you use it. Before you place adhesive on the rod blank to join it to the tip-top, you must determine the outside diameters of the rod blank.
This measurement is taken at the specific location where the tip-top will sit on the rod blank. You should not take the diameter of the very end of the rod blank, as the diameter may change at the location where the tip-top will be placed. For example, if you are cutting back part of the rod blank that is damaged, the new end may be larger in diameter then the original end of the blank.
In this case, you will have to account for the taper of the rod blank. Additionally, the thickness of the rod finish and the wraps of the thread will increase the diameter of the rod blank. Thus, these dimension will change the size of the tip-top tube for your custom rod.
This page features a calculator that will make it easy for you to determine the diameter of your rod blank and the size of the tip-top tube that you should use. The calculator will add the diameter of the taper of your cut-back rod to the diameter of the rod blank. Furthermore, the calculator will also add the thickness of the finish of your rod to the diameter of the rod blank.
Lastly, the calculator will apply a value for the amount of clearance that will be created between the rod blank and the tip-top; this value will be based on whether you want a snug hot-melt tip-top fit or whether you want more space for a field repair to the rod. The calculator will provide you with two values: the size of the standard tip-top tube that you should purchase and the amount of clearance that will be created between the tip-top and the rod blank after you assemble the tip-top to the rod. These outputs will save you the need to guess as to which of the two similar sized tubes to purchase.
Furthermore, they will ensure that you have the correctly sized tip-top for your blank. The size of the ring that you will attach to the tip-top is another measurement that you must make. However, the size of the ring will also depend on the specifications of your custom rod build.
For example, thin braided fishing lines will pass through a smaller diameter ring then the diameter required for a braid-to-leader knot. Additionally, if the fishing line is under a heavy load of sinker or if you cast the line a long distance, the load on the line will push it against the ring. Thus, the load that the fishing line will experience will factor into the size of the diameter of the ring on your tip-top; this is another reason that you must use the calculator to determine the correct size of the ring.
You want the ring to be large enough to allow your lines knot to pass through it. However, the size of the ring should not add to the overall weight of the tip-top of your custom rod. The material of your rod blank will also change the specifications of the tip-top that you use.
For instance, if your rod blank is made of high-modulus graphite, then the tip-top tube cannot be too tight to the rod blank; otherwise, it will crack the tip of your rod. Fiberglass blanks are more durable than graphite blanks, so you can use a tighter fit. Additionally, saltwater composite blanks are thicker in the application of finish and require more adhesive.
Thus, the clearance value will have to be higher for these blanks. You can select these different materials within the calculator, but you must always measure your rod blank carefully and never force the tip-top onto your rod blank. Many people makes mistakes in determining the specifications of the tip-top of their custom rods.
One mistake is measuring the blank at the wrong location or ignoring the taper of the rod. For instance, many people will measure the tip of their broken rod and purchase a tip-top that will have the same size as the tip of their rod. However, if they cut the rod to remove the damaged portion, the new end of the rod will be wider in diameter.
Thus, they must take into account the taper of the rod when measuring the diameter of the blank. Another mistake is in the selection of the clearance of the tip-top. People will select this based off a feeling rather than on the specifications of the adhesive that you will use.
For instance, using a snug hot-melt joint on a graphite rod is not the same as using an epoxy joint on a surf fishing rod that will be subjected to more rough handling than the graphite blank. These reference tables will show you the sizes of the tip-top tubes and the classes of rods for which each tip-top will work best. These tables will also show the range of clearance for tip-tops for shop builds versus field builds.
These tables can help you to verify the calculations of the calculator. They are especially helpful for individuals who own an unfamiliar type of rod blank. Once you have determined the measurements for your tip-top using the calculator, you should perform a final test of the measurements that you have taken.
This test will help to ensure that you have correctly selected the sizes of each component of your tip-top. To pass this test, place the tip-top onto your rod blank while the tip-top is dry. The ring should sit in a level position.
Additionally, the ring should allow your largest knot to pass through it without difficulty. If you are able to pass this test, then you can be sure that the glue joint will hold and that the tip-top will work correct with your rod blank. Youll find that it works much better then you expected.
It is actualy alot easier to get it right with the calculator. All the furnitures in the shop should be organized so you can recieve your parts quickly. Dont forget that the rods size matter too.
If you want a luxurius feel, then you should of checked the dimensions twice.