📡 Side Imaging Range Calculator
Calculate optimal sonar range, coverage width & frequency for your fishing conditions
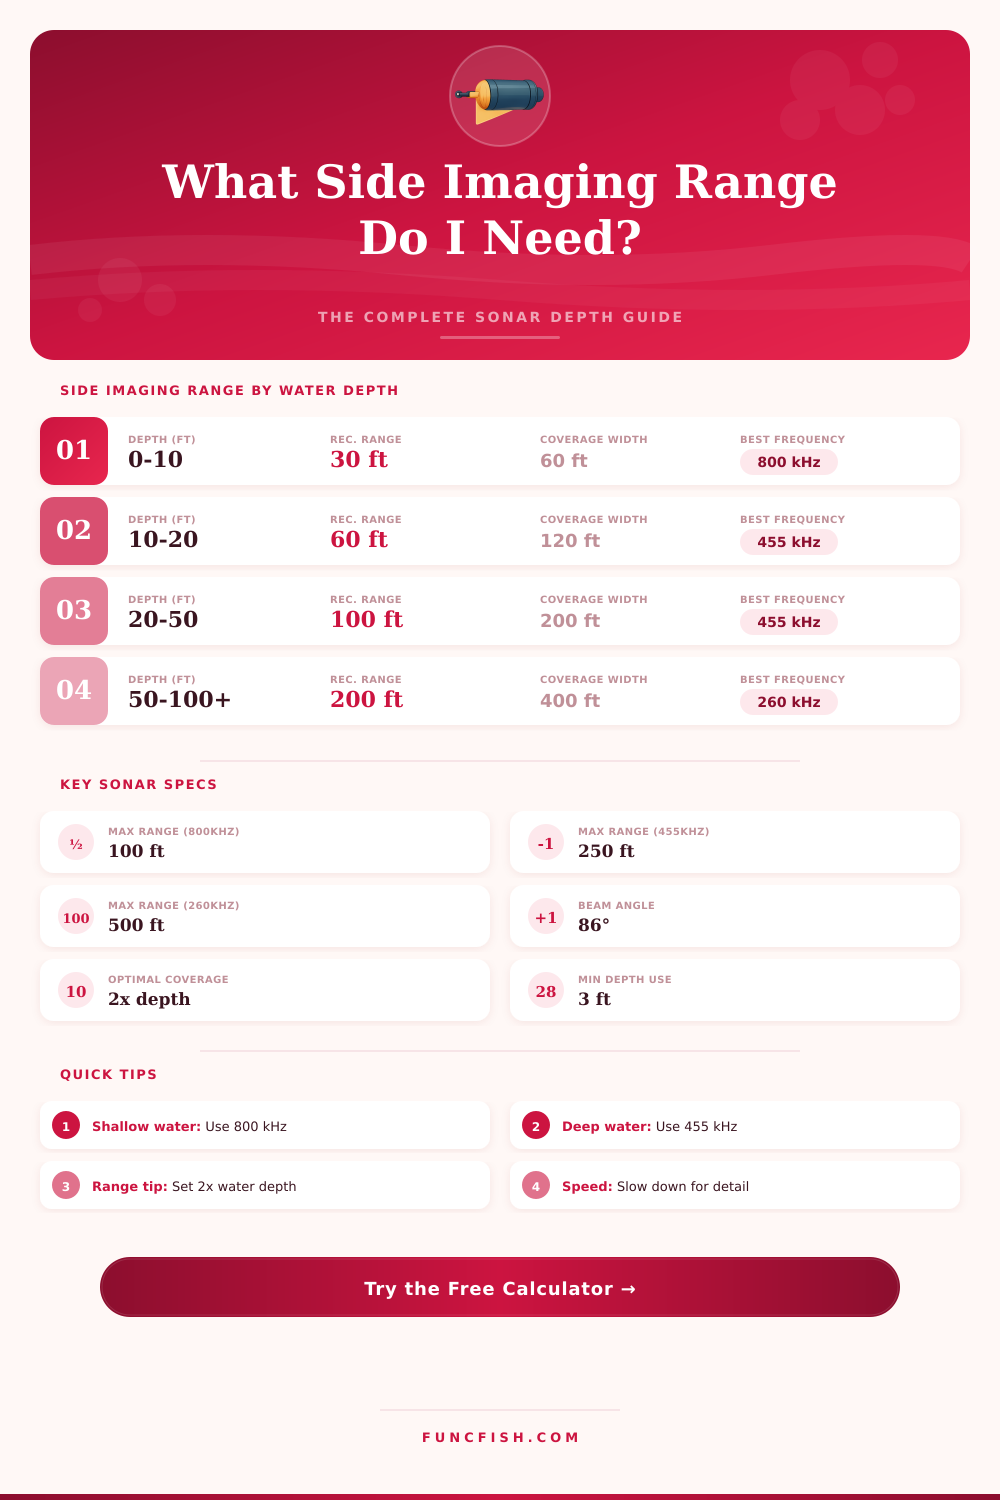
| Water Depth (ft) | Water Depth (m) | Rec. SI Range (ft) | Rec. SI Range (m) | Best Frequency | Total Coverage Width |
|---|---|---|---|---|---|
| 1 – 5 | 0.3 – 1.5 | 10 – 20 | 3 – 6 | 800 kHz | 20 – 40 ft |
| 5 – 10 | 1.5 – 3 | 20 – 40 | 6 – 12 | 800 kHz | 40 – 80 ft |
| 10 – 20 | 3 – 6 | 40 – 80 | 12 – 24 | 455 / 800 kHz | 80 – 160 ft |
| 20 – 40 | 6 – 12 | 80 – 120 | 24 – 37 | 455 kHz | 160 – 240 ft |
| 40 – 60 | 12 – 18 | 120 – 180 | 37 – 55 | 455 kHz | 240 – 360 ft |
| 60 – 100 | 18 – 30 | 180 – 250 | 55 – 76 | 455 / 260 kHz | 360 – 500 ft |
| 100 – 200 | 30 – 61 | 200 – 400 | 61 – 122 | 260 kHz | 400 – 800 ft |
| 200+ | 61+ | 300 – 500 | 91 – 152 | 260 / 200 kHz | 600 – 1000 ft |
| Species | Typical Depth | SI Range Setting | Best Frequency | Speed Rec. |
|---|---|---|---|---|
| Largemouth Bass | 2 – 25 ft | 40 – 80 ft | 800 kHz | 2.5 – 3.5 mph |
| Smallmouth Bass | 5 – 40 ft | 60 – 120 ft | 455 kHz | 2.5 – 4 mph |
| Walleye | 10 – 50 ft | 80 – 150 ft | 455 kHz | 3 – 5 mph |
| Crappie | 5 – 20 ft | 40 – 80 ft | 800 kHz | 1.5 – 3 mph |
| Catfish | 5 – 60 ft | 80 – 200 ft | 455 kHz | 2 – 4 mph |
| Striped Bass | 20 – 80 ft | 100 – 200 ft | 455 kHz | 3 – 6 mph |
| Pike / Muskie | 5 – 40 ft | 60 – 120 ft | 455 kHz | 3 – 5 mph |
| Trout (Lake) | 20 – 100 ft | 100 – 250 ft | 455 / 260 kHz | 2 – 4 mph |
| Panfish / Bluegill | 2 – 15 ft | 30 – 60 ft | 800 kHz | 1.5 – 2.5 mph |
| Offshore Species | 50 – 300 ft | 200 – 500 ft | 260 / 200 kHz | 3 – 8 mph |
| Frequency | Max Depth | Max SI Range | Detail Level | Best Use | Condition Penalty |
|---|---|---|---|---|---|
| 800 kHz | 20 ft / 6 m | 100 ft / 30 m | Very High | Shallow structure | High in turbid water |
| 455 kHz | 80 ft / 24 m | 250 ft / 76 m | High | Most freshwater | Moderate in current |
| 260 kHz | 200 ft / 61 m | 400 ft / 122 m | Medium | Deep lakes / coastal | Low penalty |
| 200 kHz | 300+ ft / 91 m | 500 ft / 152 m | Lower | Offshore / deep | Minimal penalty |
Side imaging is a sonar technology that use sound beams to create images of the bottom of the water column and the object present upon the bottom. Side imaging work by firing sound beams from the transducer sideways and uses the reflected sound waves to create a picture of the objects to the left and right of the boat. To use side imaging effective, a person must understand how depth, boat speed, and sonar frequency relate to one another.
These three factor will determine whether the side imaging sonar array produce clear or blurry images. Depth is one of the first factor to consider when using side imaging sonar. Side imaging device have range settings that determine how far the sound beams from the sonar will travel before the signal weaken.
How to Get Clear Side Imaging Sonar Pictures
In areas of shallow water, such as 10 to 20 feet deep, a person should use a narrow range setting on the side imaging sonar device. If a person selects a wide range setting in these shallow waters, the side imaging signal will become blurred. In deep water basin, a person use a wide range setting on the side imaging device, but the boat should travel at a slower speed when using these settings.
Boat speed is another important factor that will impact the quality of the side imaging sonar data. At slow speed, such as 1.5 to 2.5 miles per hour, a side imaging sonar device will capture the most detailed image of the bottom. As the boat speed increase to 3 or 4 miles per hour, the details of the bottom will begin to fade.
To get the best results from the side imaging sonar device, a person must select a boat speed that relate to the purpose of the side imaging sonar. Side imaging devices use different frequency band to image the bottom of the water column. High frequency provide the most detailed images of the bottom but only work well in shallow waters.
This is due to the fact that high frequency of sound fade quickly as they travel through the water. The most common frequency settings for side imaging are around 455 kHz and work best in depths between 35 and 120 feet. Low frequency settings can travel the deepest distance into the water but do not provide the same level of detail as higher frequencies.
Side imaging sonar data can also be affected by the clarity of the water and the type of bottom that the sonar scans. In areas of murky water, such as river, a person should use narrow side imaging settings and use a higher amount of overlap between passes of the boat. The turbulence in the murky water will reflect the side imaging sonar beam and hide any object on the bottom.
In areas with many weeds or timber on the bottom, a person should increase the overlap between side imaging passes to 30 percent or more. This will ensure that there are no missed area in the side imaging survey of the area. For areas with open bottom, a person can use a wider side imaging setting.
The distance between the boats pass will impact the side imaging sonar data. A person should use an overlap between side imaging passes of 15 to 35 percent depending on the number of object on the bottom. For areas with many rock or areas with high current, the overlap should be closer to 35 percent.
Using the same percentage of overlap between side imaging passes will ensure that the side imaging device create a seamless map of the area being sonar scanned. The depth of the transducer must also be considered. Since the transducer will add to the depth of the water, a person must consider the depth of the transducer when using side imaging to map the bottom of the water.
A person should also avoid speeding through any area that may contain specific detail with the sonar image. When a boat speed through an area with detail, the side imaging images will be unreadable. To use side imaging effective, a person should follow a set of processes and side imaging setting.
A person should start by slowing the boat and narrowing the side imaging range setting to determine if the image become clearer. A person can then adjust the overlap or the frequency setting of the side imaging sonar device to match the depth and type of bottom in the area being mapped. By following these step and using these settings for side imaging, a person will have clear side imaging images when using the sonar device.
You should of used a slower speed to avoid blurriness. Its important to recieve good data.