
Next time you see a hermit crab contemplating a shell, think of it as bargaining for a new home: Why does the crab tap-tap at the entrance with its pincers before retreating and trying again? It is making an assessment of survival, checking if that shell can keep its soft belly safe from drying out and attack. That’s what shell shopping realy amounts to. Not looks but safety.
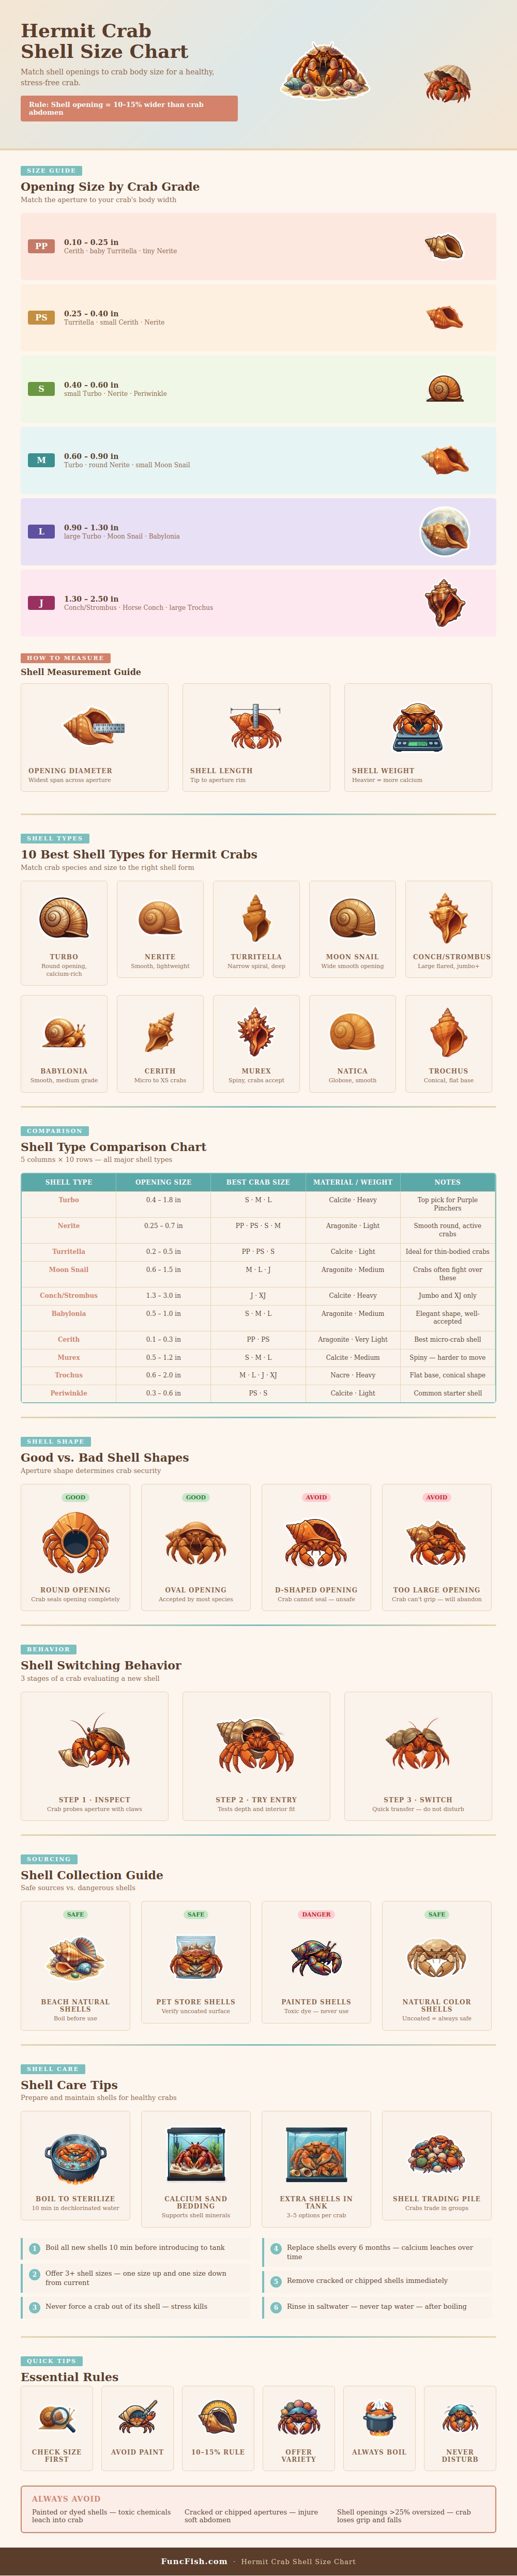
To ensure proper fit, look for shells with an opening that’s about 10-15% bigger in diameter then the crab’s body. That way the crab can pulls all the way back in and won’t be crowded, but also so he/she doesn’t get wedged into shell. To make those sizes work with various grades (from pre-pinkie up to jumbo) there is a sizing chart. By knowing where the sizes fall on the chart, you don’t have to estimate when shopping. For example, a pre-pinky should fit into a shell just slightly bigger than a grain of rice, whereas a big crab might need a shell with an opening close to two inches. Getting those sizes right is important as both an oversized shell makes the crab feel insecure and an undersized one impedes molting.
How to Choose Shells for Hermit Crabs
While the right shell must be big enough, it’s also important what it’s made of. For example, turbo shells are thought of as gold standards. They are solid calcium and round with an open end that provides a good seal. They are also heavier than other shells. Nerites is smooth and light, easy for an active crab to pick up and move around. Turritellas have a deeper spiral (some crabs likes this additional coverage, especially thin body type). A comparison section details these variations so you can find the best shell(s) for your collection.
The key is to mix things up. Each crab has its own preference. Stay away from dyed or painted shells at all costs (the dye comes off, contaminating the water and killing your crabs)! Only natural colors is safe.
When you introduce new shells, boil them for ten minutes in dechlorinated water to sterilize them. Boil the shells in dechlorinated water for ten minutes to sterilize them. This will kill parasites and other potentially harmful bacteria that may be on shells obtained from store or the beach. Allow the shells to thoroughly air dry before introducing them to habitat.
Always offer multiple shell options (three to five) for each crab, some slightly larger and slightly smaller than what they already reside in. That way, as the crab grows, it can trade up slowly. If you see one attempting to force itself into a smaller shell, it’s probably about to molt and requires private space in a dedicated chamber immediately.
One interesting aspect of keeping crabs is watching as each switches shells. It’s quite fast. Probing around the opening with its claws, checking how deep it is inside, and making a quick choice. Occasionally two crabs will swap in a matter of seconds. That dynamic swapping also distribute the goodies equally throughout all members of your group.
Don’t ever try to force one crab out of its shell and into another if you think that one is “better.” Not only is that stressful for the crab, but it could kill it. Let the crabs do their thing. They’ll pick what suits them best. Leave it be. If a crab leaves a shell, don’t bother with it because they may come back to it once their needs has changed.
Keep an eye on your shells for wear and tear. Over time, calcium will start to leach from them. Older shells should of been replaced every six months to make sure they provide the most nutrition for your tank. Any shells with chips or cracks should be removed ASAP as well, you don’t want those rough surfaces causing any harm! The soft abdomen is sensitive, and rough edges can cause serious damage.
Make sure the size, type of material, and safety are all considered when setting up this space so that your crabs feel comfortabley enough to thrive. When the fit is just right, their initial reluctance about entering the new shell fades away. They find themselves a spot that feels like home; they seal it up, lie down, and enjoy a good night’s rest.