The Garmin Striker 4 portable units have dominated the market when it comes to compact devices for smaller boats. If you’re also looking for an affordable unit that doesn’t set you back thousands of dollars, then this series from Garmin has got you covered with the best performance. However, anglers still have a hard time trying to interpret the system in some situations. It can be a bit complex to read the flasher on the Garmin Striker 4, and you will have to put in some time to effectively interpret the system. So, go through the details mentioned here.
How To Read Flasher On Garmin Striker 4
The flasher might be an old feature that you get with this unit, but no angler can deny that it is not effective. You will enjoy incredible efficiency with this system, and here is how to read the flasher on the Garmin Striker 4 fish finder.
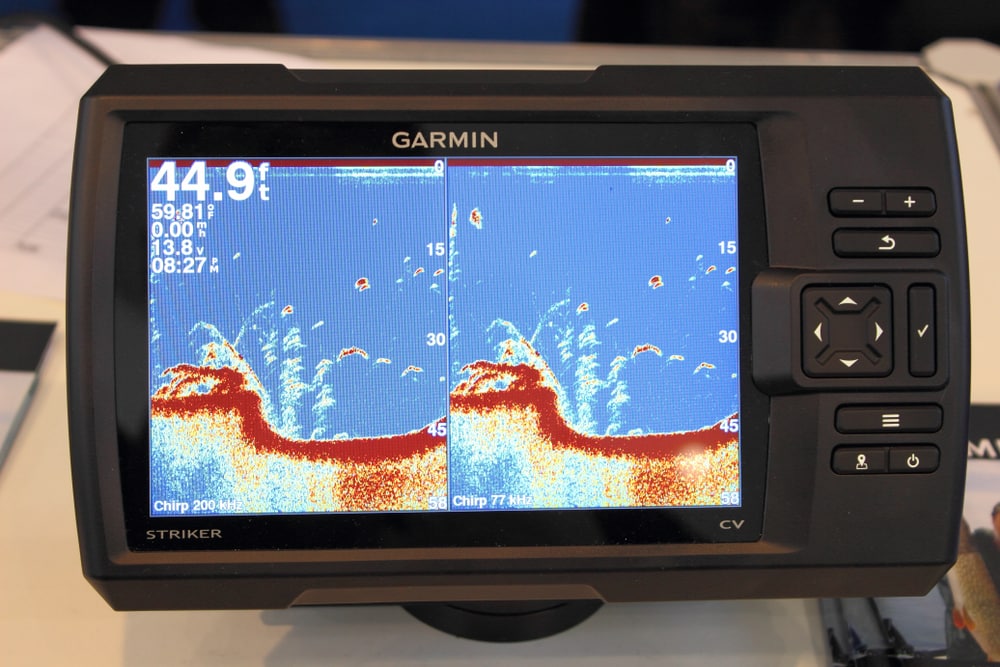
- The flasher mode on the Garmin Striker 4 will present a complete water column that gives you a holistic perspective of the surface and water column. The blue area on the flasher shows the water column, while the red and orange sections represent the bottom.
- The water depth, voltage throughout the system, and the temperature of the water is all represented through the top section of your fish finder. If there are no fish in the range, then the water column will be all blue. However, when the flasher detects fish, it will show a red band in the water column.
- You can keep track of this red band to determine the depth of the fish relative to the overall depth of the water. Multiple bands will represent multiple fish in the water, and you can adjust your course accordingly to benefit from a higher concentration of fish.
- The bait will also cast a similar effect where it will develop a lighter band that will travel towards the fish. Once the band cast by your bait meets the red section that indicates the fish, you’ll know that the bite has gone through.
- The hook-up through your fishing system will extend the red band on the flasher, and you should focus more on the fight at this point. Make sure to manage the rod action accordingly and catch the fish. This will reset the blue column as you cast your bait again to target fish at variable depths.
You can experiment with baits of different sizes and test the response from the flasher to get a better idea of this feature. It will take a bit of time to get used to the rapid changes in the water column, but once you are comfortable with this feature, there will be a massive boost in your fishing efficiency.
So, if you’re struggling to detect catches or the depth readings are not accurate through the arches and the colored icons, then make sure to switch to the flasher. You will have an amazing time as you leverage the responsiveness of the flasher for a better fishing experience.